Category / Section
2. Setting up your Zebra Printer
Published:
3 mins read
Updated:
Previous step: Enable badge printing and share requirements
In this article, you will learn how to set up your Zebra Printer for your Zuddl Onsite Event.
Supported devices
Zuddl currently supports only Zebra ZD models:
1. Unboxing
- Carefully unpack the printer and remove all packaging materials.
- Inspect the printer for any visible damage that may have occurred during shipping.
2. Connect to power
Connect the power cord to the printer and plug it into a power outlet.
3. Load media
- Open the printer cover and load the desired media (labels, tags, etc.) into the media compartment.
- Adjust the media guides to match the width of the media being used.
- Close the printer cover securely.
Video Link: https://www.youtube.com/watch?v=eUw4jhHZaeg
1. If using thermal transfer printing, install the ribbon onto the ribbon supply spindle and ribbon take-up spindle.
2. Thread the ribbon through the printer's ribbon path according to the printer's instructions.
Video link: https://www.youtube.com/watch?v=ZwOv9hFEJQU
4. Ethernet Connection
- Ensure the printer is powered off.
- Locate the Ethernet port on the printer, typically located on the back or side of the device.
- Plug one end of the Ethernet cable into the Ethernet port on the printer.
- Connect the other end of the Ethernet cable to an available LAN port on your network router or switch.
- Power on the printer; if the printer is connected to the network, it shows the network status in green.
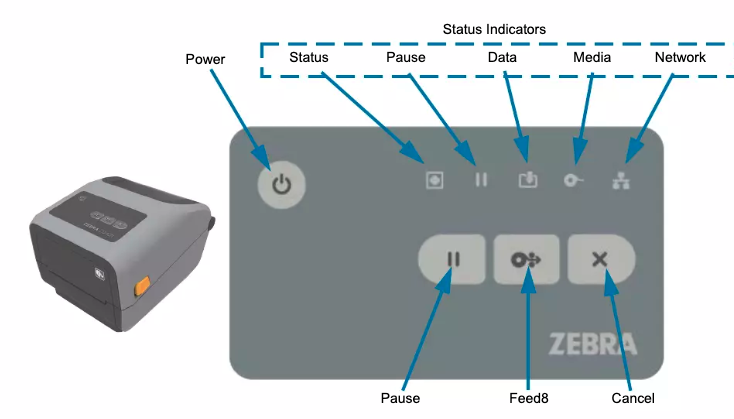
5. Calibrate
- Press the Calibration button(Feed8).
- After entering calibration mode, the printer will feed one/two labels and measure the label length.
- Once the label has been fed, the printer will pause briefly.
The printer will then measure the label length and adjust the sensor accordingly
