How to Set Up Attendee Emails for a Hybrid Event in Zuddl
Last updated: September 2, 2025
Zuddl lets you easily create multiple event-specific emails using templates and send them to your attendees and speakers directly from your own email address. Learn how to add custom email addresses.
A simple drag-and-drop editor helps you to custom-build your email design and content.
Editing email templates gives you more control and saves the time and effort required to manually compose emails for the different stages, such as registration, reminder emails, and more. The email types are categorized based on the recipients; Attendees and Speakers which can be configured from their respective tabs.
The table below explains the email types for both attendees and speakers.
Email Type | Description | Default State |
Registration confirmation | An action-based email is triggered when an attendee registers from the landing page for the event. If the attendee has purchased a ticket, you can show the ticket type and amount (for paid access). You can show it as "free" if it is a free ticket. Only for attendees So that you know, this" email is not sent when you add an attendee from the organizer dashboard. | Off |
Reminder ~ 7 Day to Go | Sent seven day before the event. Time-based trigger. Based on the event date & time. | |
Reminder ~ 1 Day to Go | Sent one day before the event. Time-based trigger. Based on the event date & time. | Off |
Reminder ~ 1 Hour to Go | Sent one hour before the event. Based on the event date & time. | Off |
Reminder ~ 5 minutes to Go | Sent 5 minutes before the event. Based on the event date & time. | Off |
Thank You for Coming! | Sent 2 hours after the event has ended. Based on the event date & time. | Off |
We missed you at the event! | You have sent participants who couldn't join the event two hours after the event's end time. | Off |
Reminder: Add Attendee Details | Sent one day before the event to people who purchased tickets without adding attendee details. | Off |
Ticket confirmation | Sent to the buyer when a ticket is purchased | Off |
Ticket cancellation | Sent to the buyer when a ticket is canceled | Off |
Ticket Purchase Approved | Sent to the buyer when a ticket purchase is approved | |
Registration Rejected | Sent to attendees when their registration is rejected. | Off |
Registration Pending Approval | Sent when attendees register and their approval is pending. | Off |
Event Canceled | Sent when the event has been canceled | On |
Abandoned registrations: Immediate | Sent when someone exits the registration process and when the checkout timer runs out | Off |
Abandoned registrations : 1 day later | Sent to remind people about their incomplete registrations after 1 day of abandonment | Off |
Abandoned registrations : 4 days later | Sent to remind people about their incomplete registrations after 4 days of abandonment. | Off |
Abandoned registrations : 1 week later | Sent to remind people about their abandoned registrations after 1 week of abandonment | Off |
Decline event invitation | Sent when an invitee declines an event invitation. | Off |
Ticket cancellation without refund: Purchaser | Sent to the purchaser when the ticket(s) purchased is canceled and no refund is issued | On |
Ticket cancellation with refund: Purchaser | Sent to the purchaser when the ticket(s) purchased is canceled and a refund is issued | On |
Ticket cancelation: Attendee | Sent to the attendee(s) when their ticket(s) are canceled | On |
Registrant details modified | Sent to attendees when they modify their registration details using the Edit registration button. A copy of the email is also sent to the purchaser (if any). You can edit the default fields in the template to show relevant fields of your registration flow were modified. Fields with empty values will appear empty in the email. | Off |
Order modified: Purchaser | Sent to purchaser when the purchase order is modified by the organizer. | |
Order modified: Attendee | Sent to attendees when the purchase order is modified by the organizer. | |
CPE certificate | Sent to attendees when they want to download certificate |
If a user has unsubscribed to any email, those emails won't be triggered for that user.
Purchaser details modification
If the purchaser clicks the 'Edit registration link' (special link) in an email, the purchasers can edit their and the attendee's details. When the purchaser edits the registrant details, the Registrant details modified email is sent to both the registrant and purchaser.
Setting up your email
You can edit the default email template to customize the email according to your requirements.
To design a particular email type,
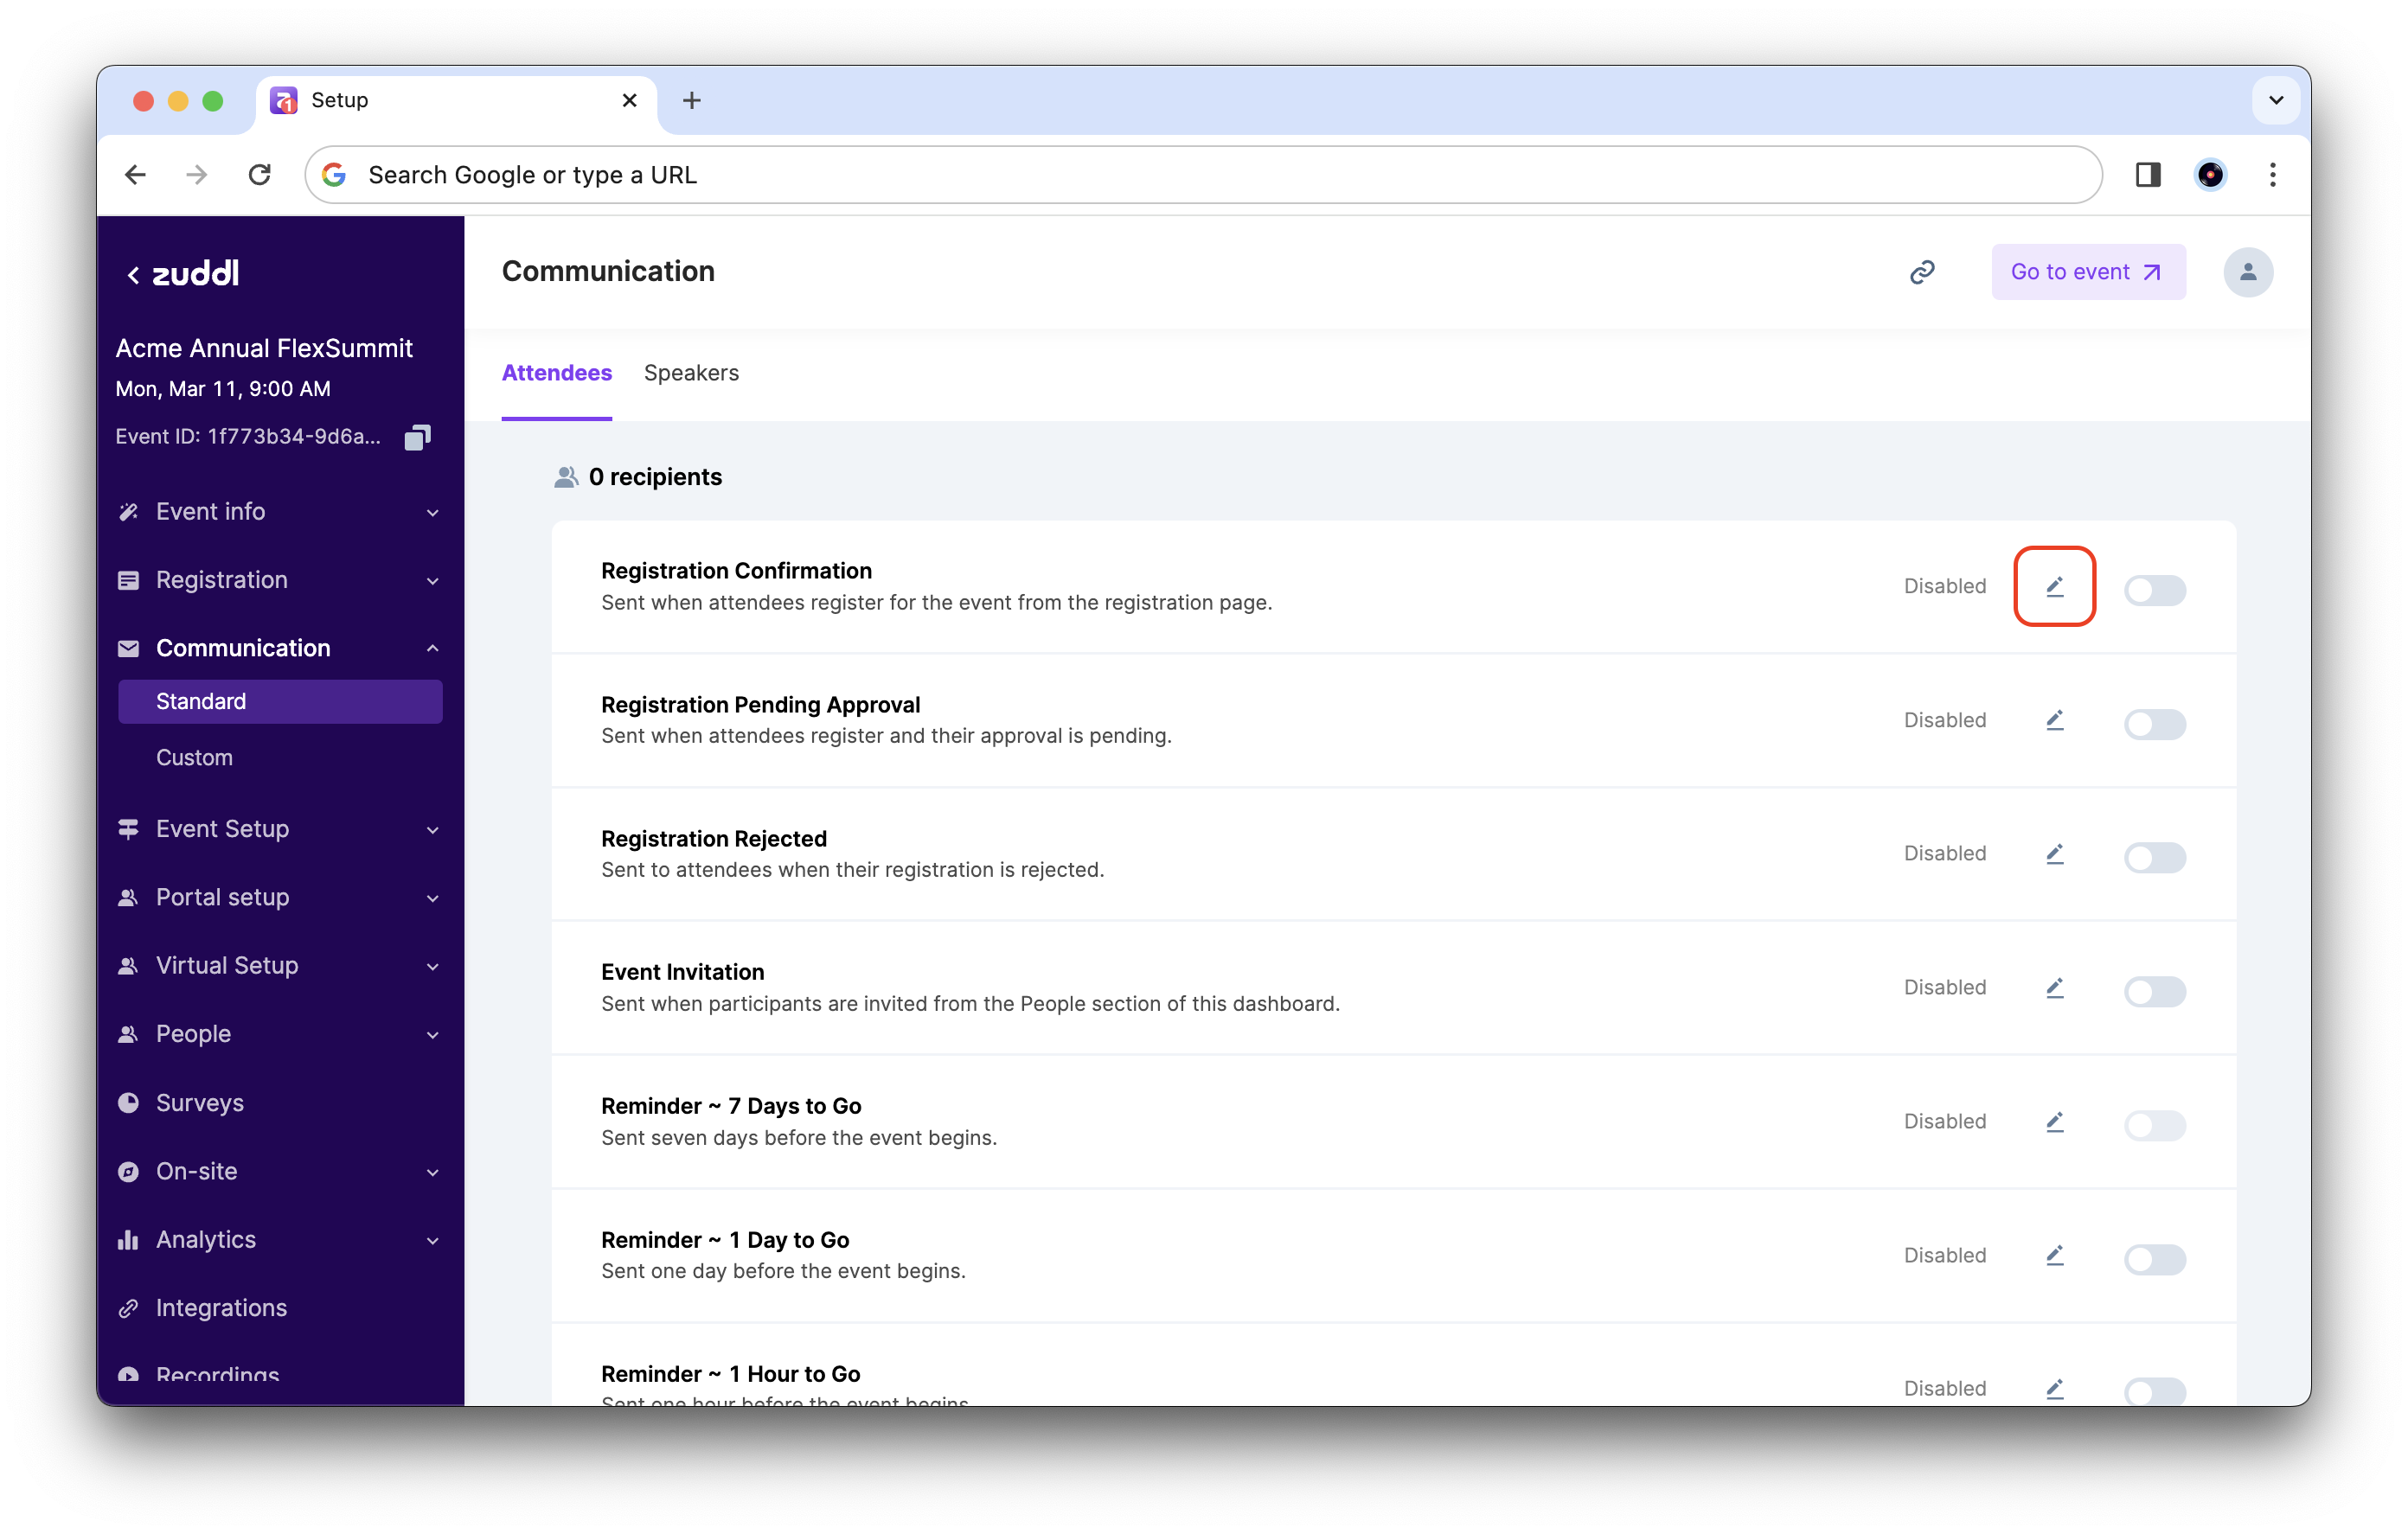
Go to Communication.
Choose an email template to edit, say Registration Confirmation.
Click the edit icon. This takes you to the email editing page.
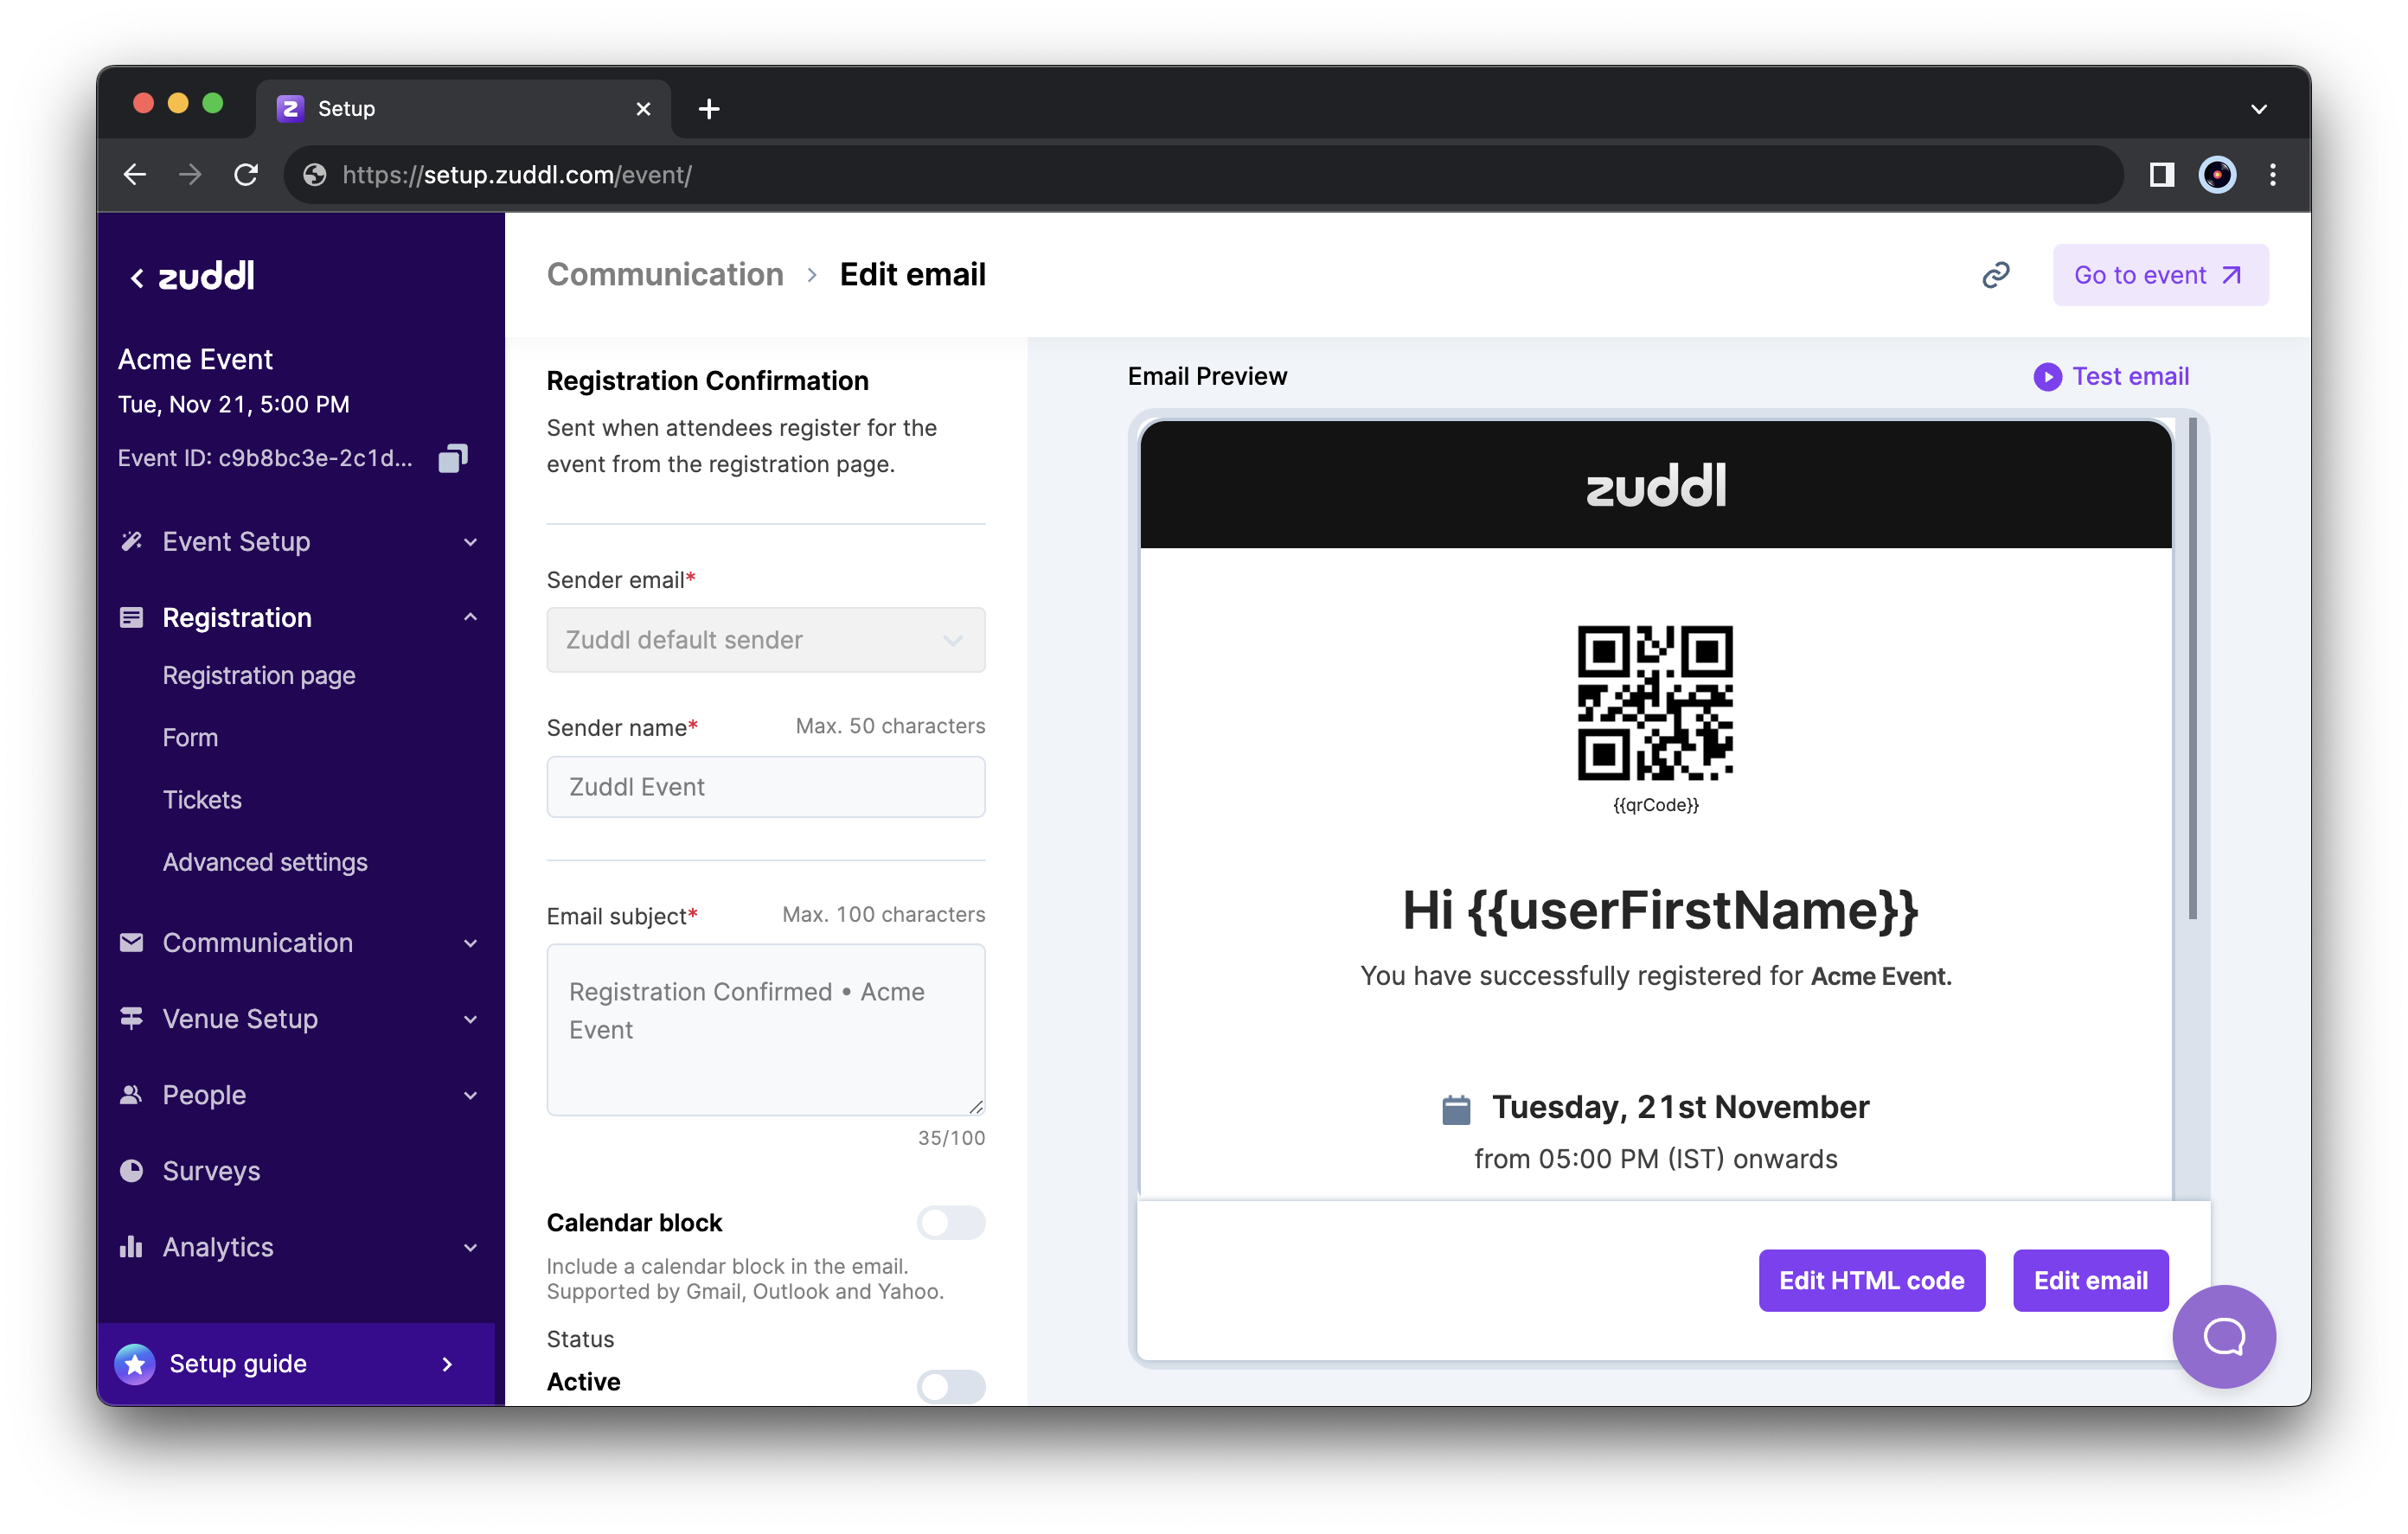
Select a Sender email from the dropdown. The dropdown menu shows all the verified sender emails of all domains, including the Zuddl default sender (default). You can select a specific sender email besides the default for each email type. The selection you make here will override the default selection you made in the Email addresses menu in the standard dashboard. Learn how to add custom email addresses.
Optional. Under Status, toggle on Active to turn on this email type. This action can also be done from the listing page. This lets you edit the Sender name and Email subject.
In the Email subject textbox, enter an email subject, for example, "Registration Confirmed - ."
The character limit for the email subject is up to 100.
Calendar block
Configuring a calendar block is optional. Toggle on the Calendar block to add calendar invite links to the email for Google, Yahoo, Outlook, and Apple.
Choose your RSVP settings
Send RSVP responses to the configured reply email: The reply email address is the Reply to email which you configure from your Email addresses tab on the dashboard homepage.
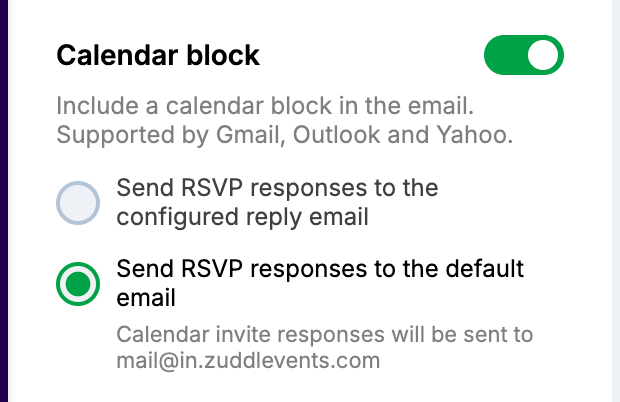
This option only works for custom sender email address with Reply to email configured from the dashboard homepage. This option does not apply when the Zuddl default sender is selected as the Sender email. If you switch from a custom sender to Zuddl default sender, this option is disabled.
Send RSVP responses to the default email (default): mail@in.zuddlevents.com
This option works for both the custom sender and the Zuddl default sender.
Using the same sender for calendar block
For a particular event, depending on the sender used to send the first email, the subsequent emails follow the same sender email address, regardless of any setting changes. So it is recommended to keep the same sender email address for email communications with calendar block.
Google Calendar Settings
If your attendees are using Google Calendar, you should learn how Zuddl's calendar block works on specific settings of Google Calendar.
- From everyone: The calendar block is added automatically
- Only if the sender is known: This option adds an invitation block to your calendar only if the sender email is in your contacts or if you've interacted with them before. Learn how to add a custom email address for communication.
When I respond to the invitation in email: The calendar block gets added only when you respond to the invitation in email.
When a registrant clicks the Add to calendar link in an email, all event fields get auto-filled to their respective fields in the calendar invite.
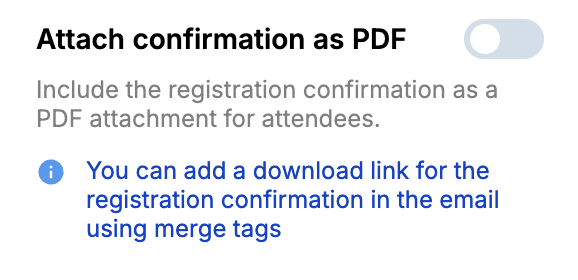
Attachments
You can also toggle on the Attach confirmation as PDF to include the registration confirmation PDF attached to your email for attendees. Alternatively, you can choose to disable the email attachment and add a download PDF link in the email body. This download PDF link can be added using a special link in the email builder. Learn how to use the special link.
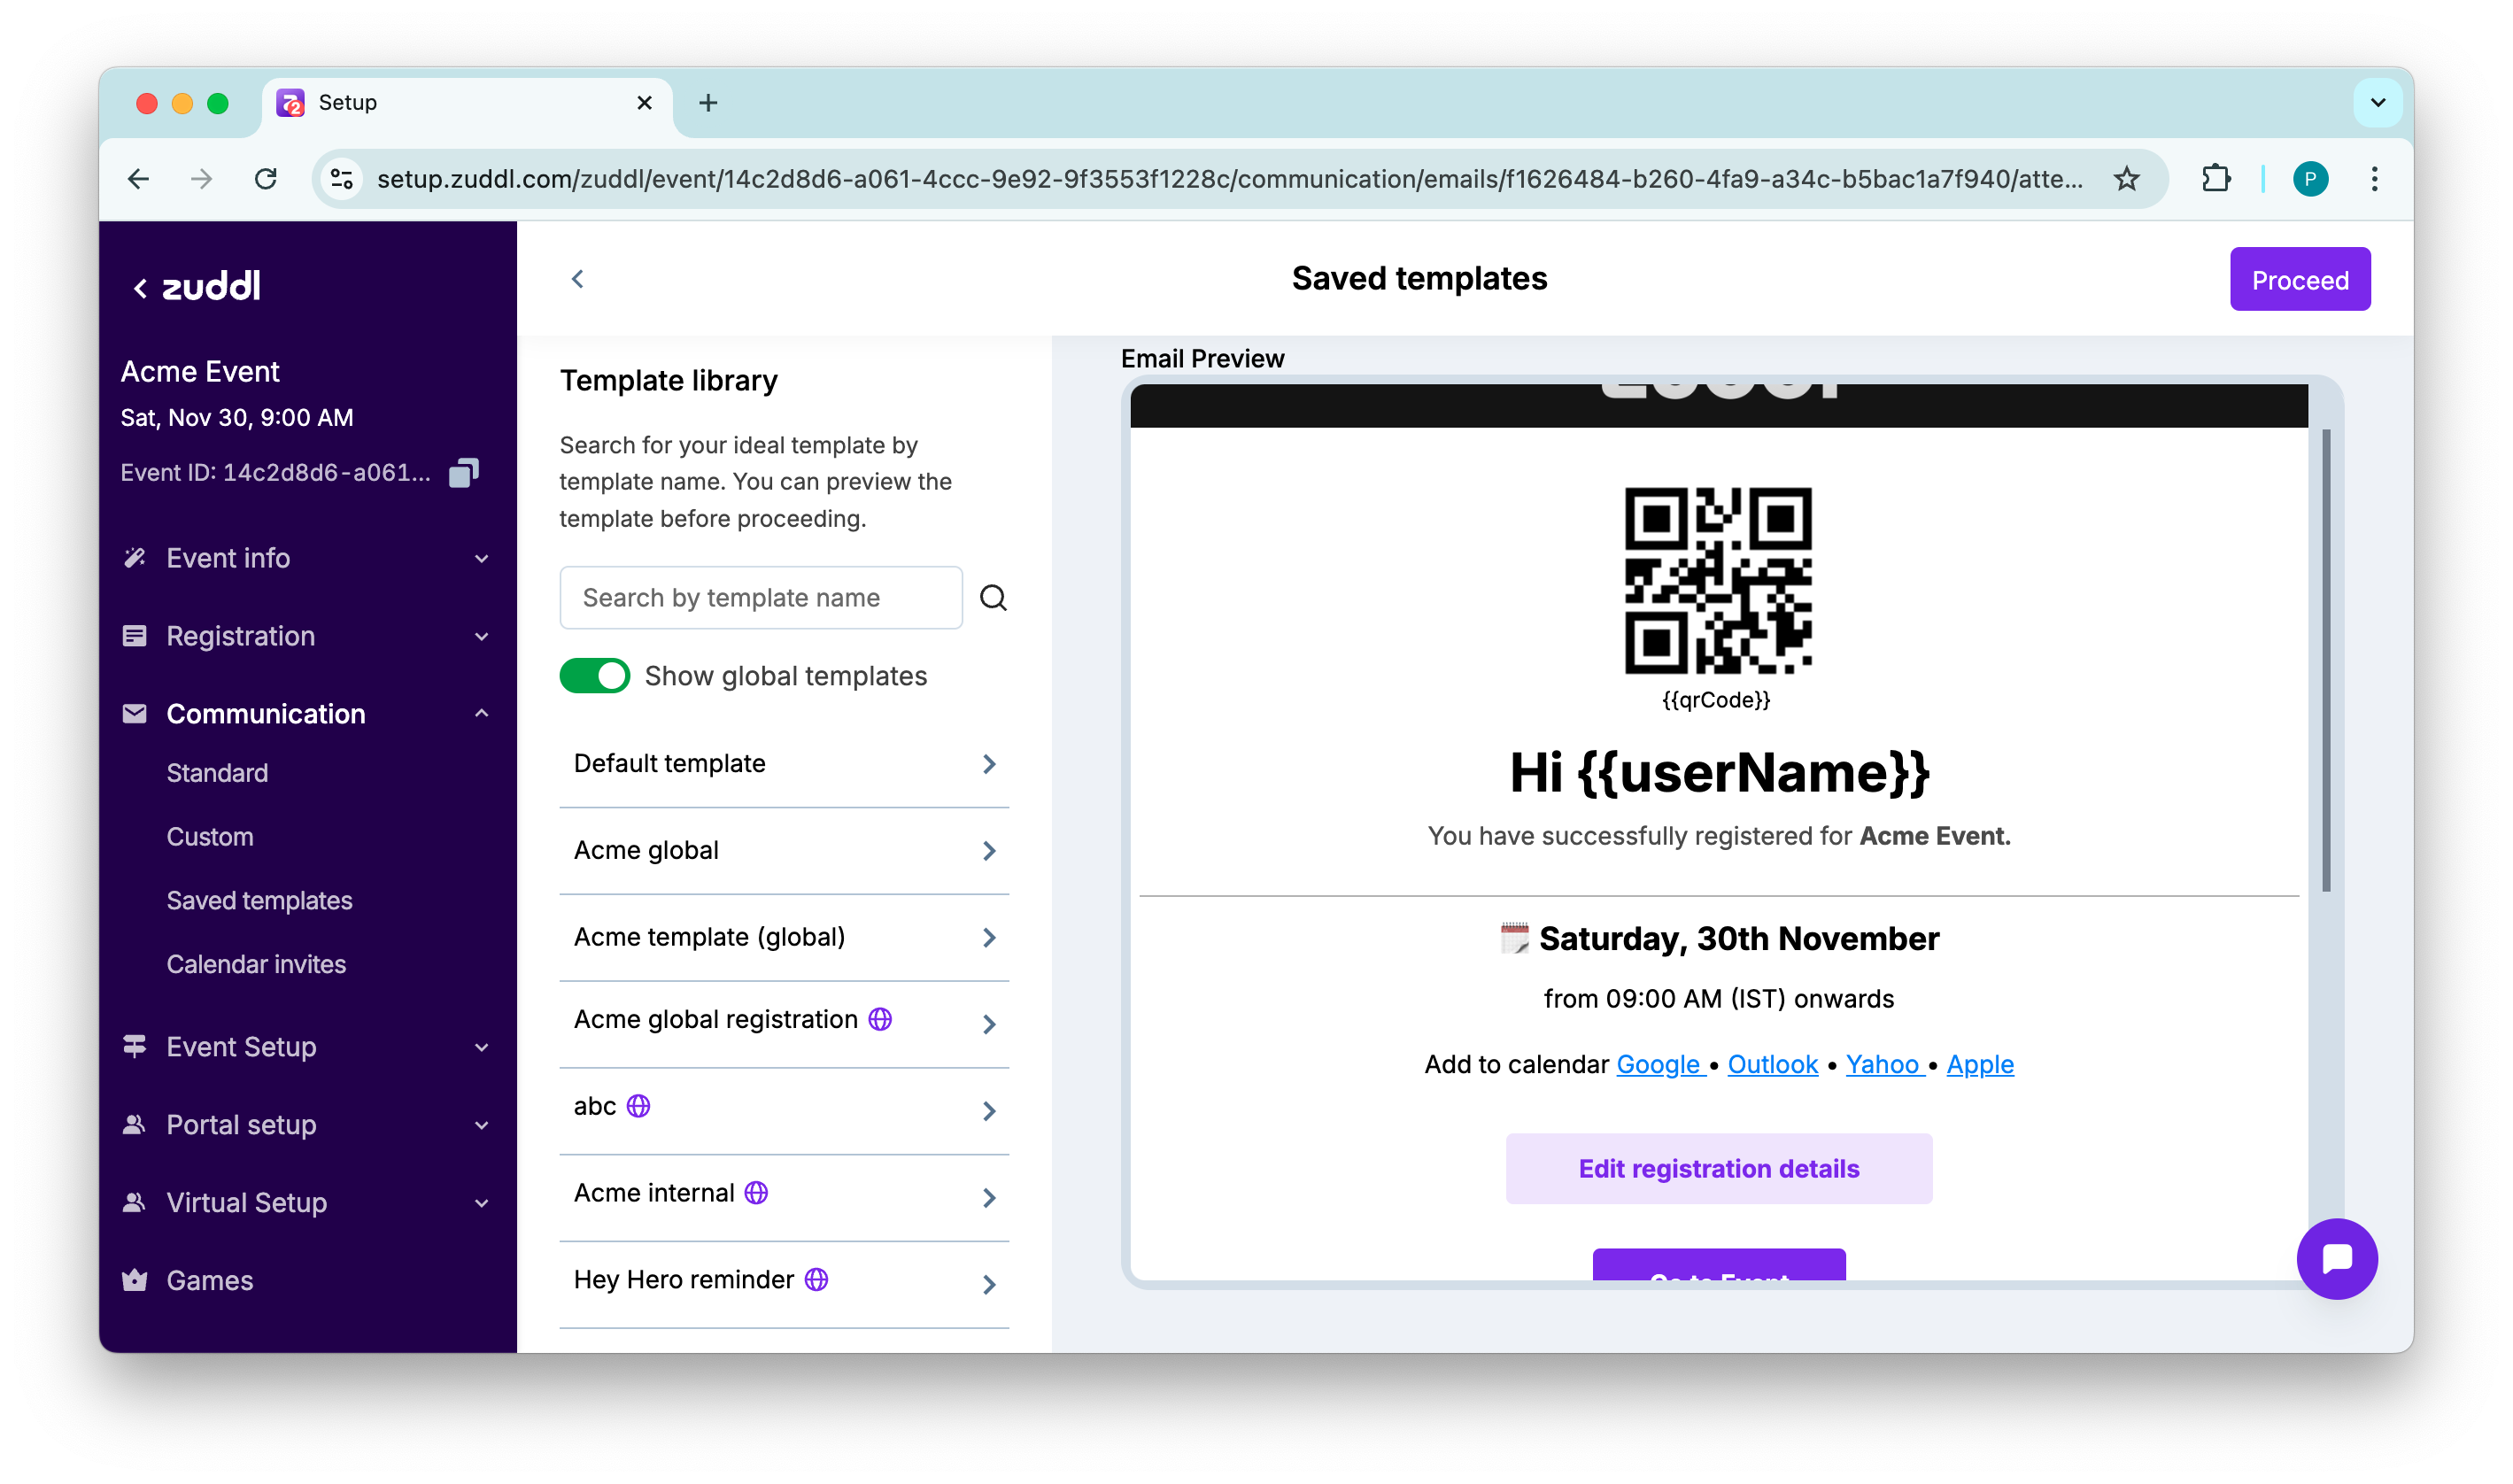
Choose templates
You can choose an existing template by clicking the Use an existing template section.
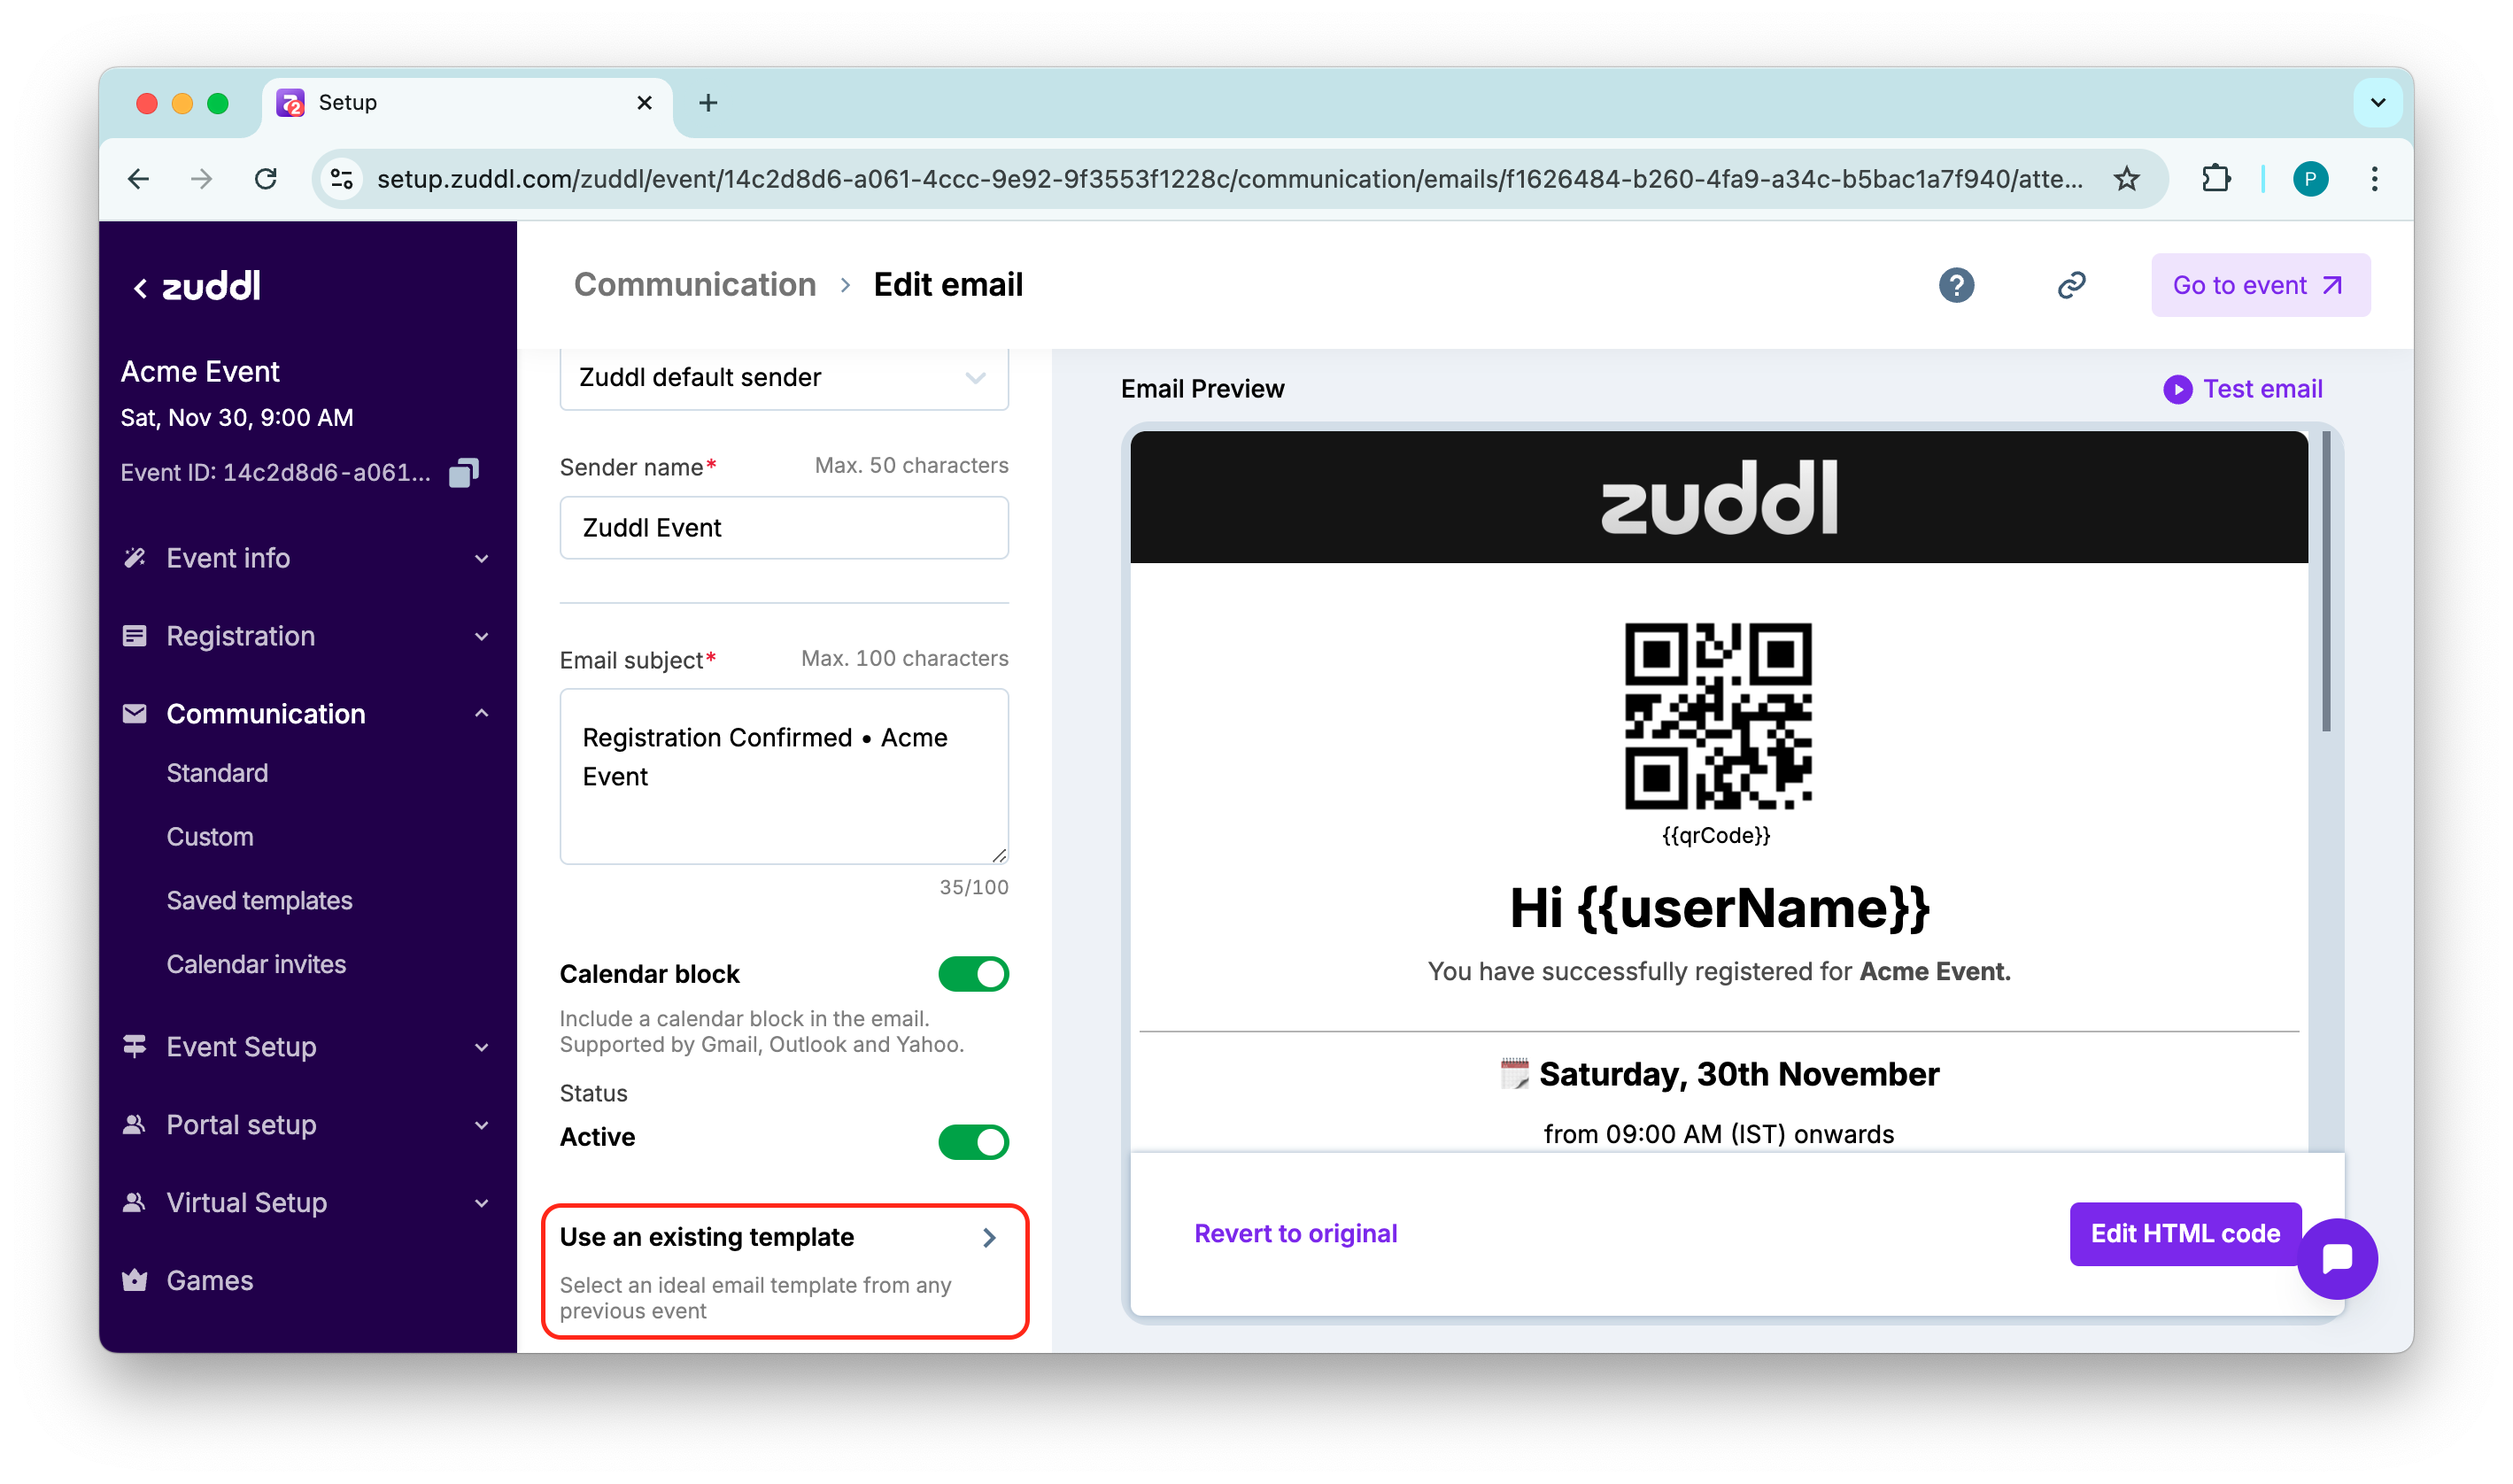
You can choose from the list of saved event-level templates or toggle on global templates to view the global templates (templates saved at organization-level).
On the Edit email page, the template section shows the template name that is in use. If you edit the template, the template name stops showing up.
Customizing your email
There are two ways of customizing your email content, as shown on the preview pane:
Edit HTML code
Build your email (using the email builder)
Edit HTML code
You can edit the default Zuddl email template to customize the email according to your requirements.
Click Edit HTML code to edit the HTML code of the email body. This opens the HTML editor with side-by-side preview of the email where you can see the output of the HTML code.
After you've made changes to the code, click Save email dropdown.
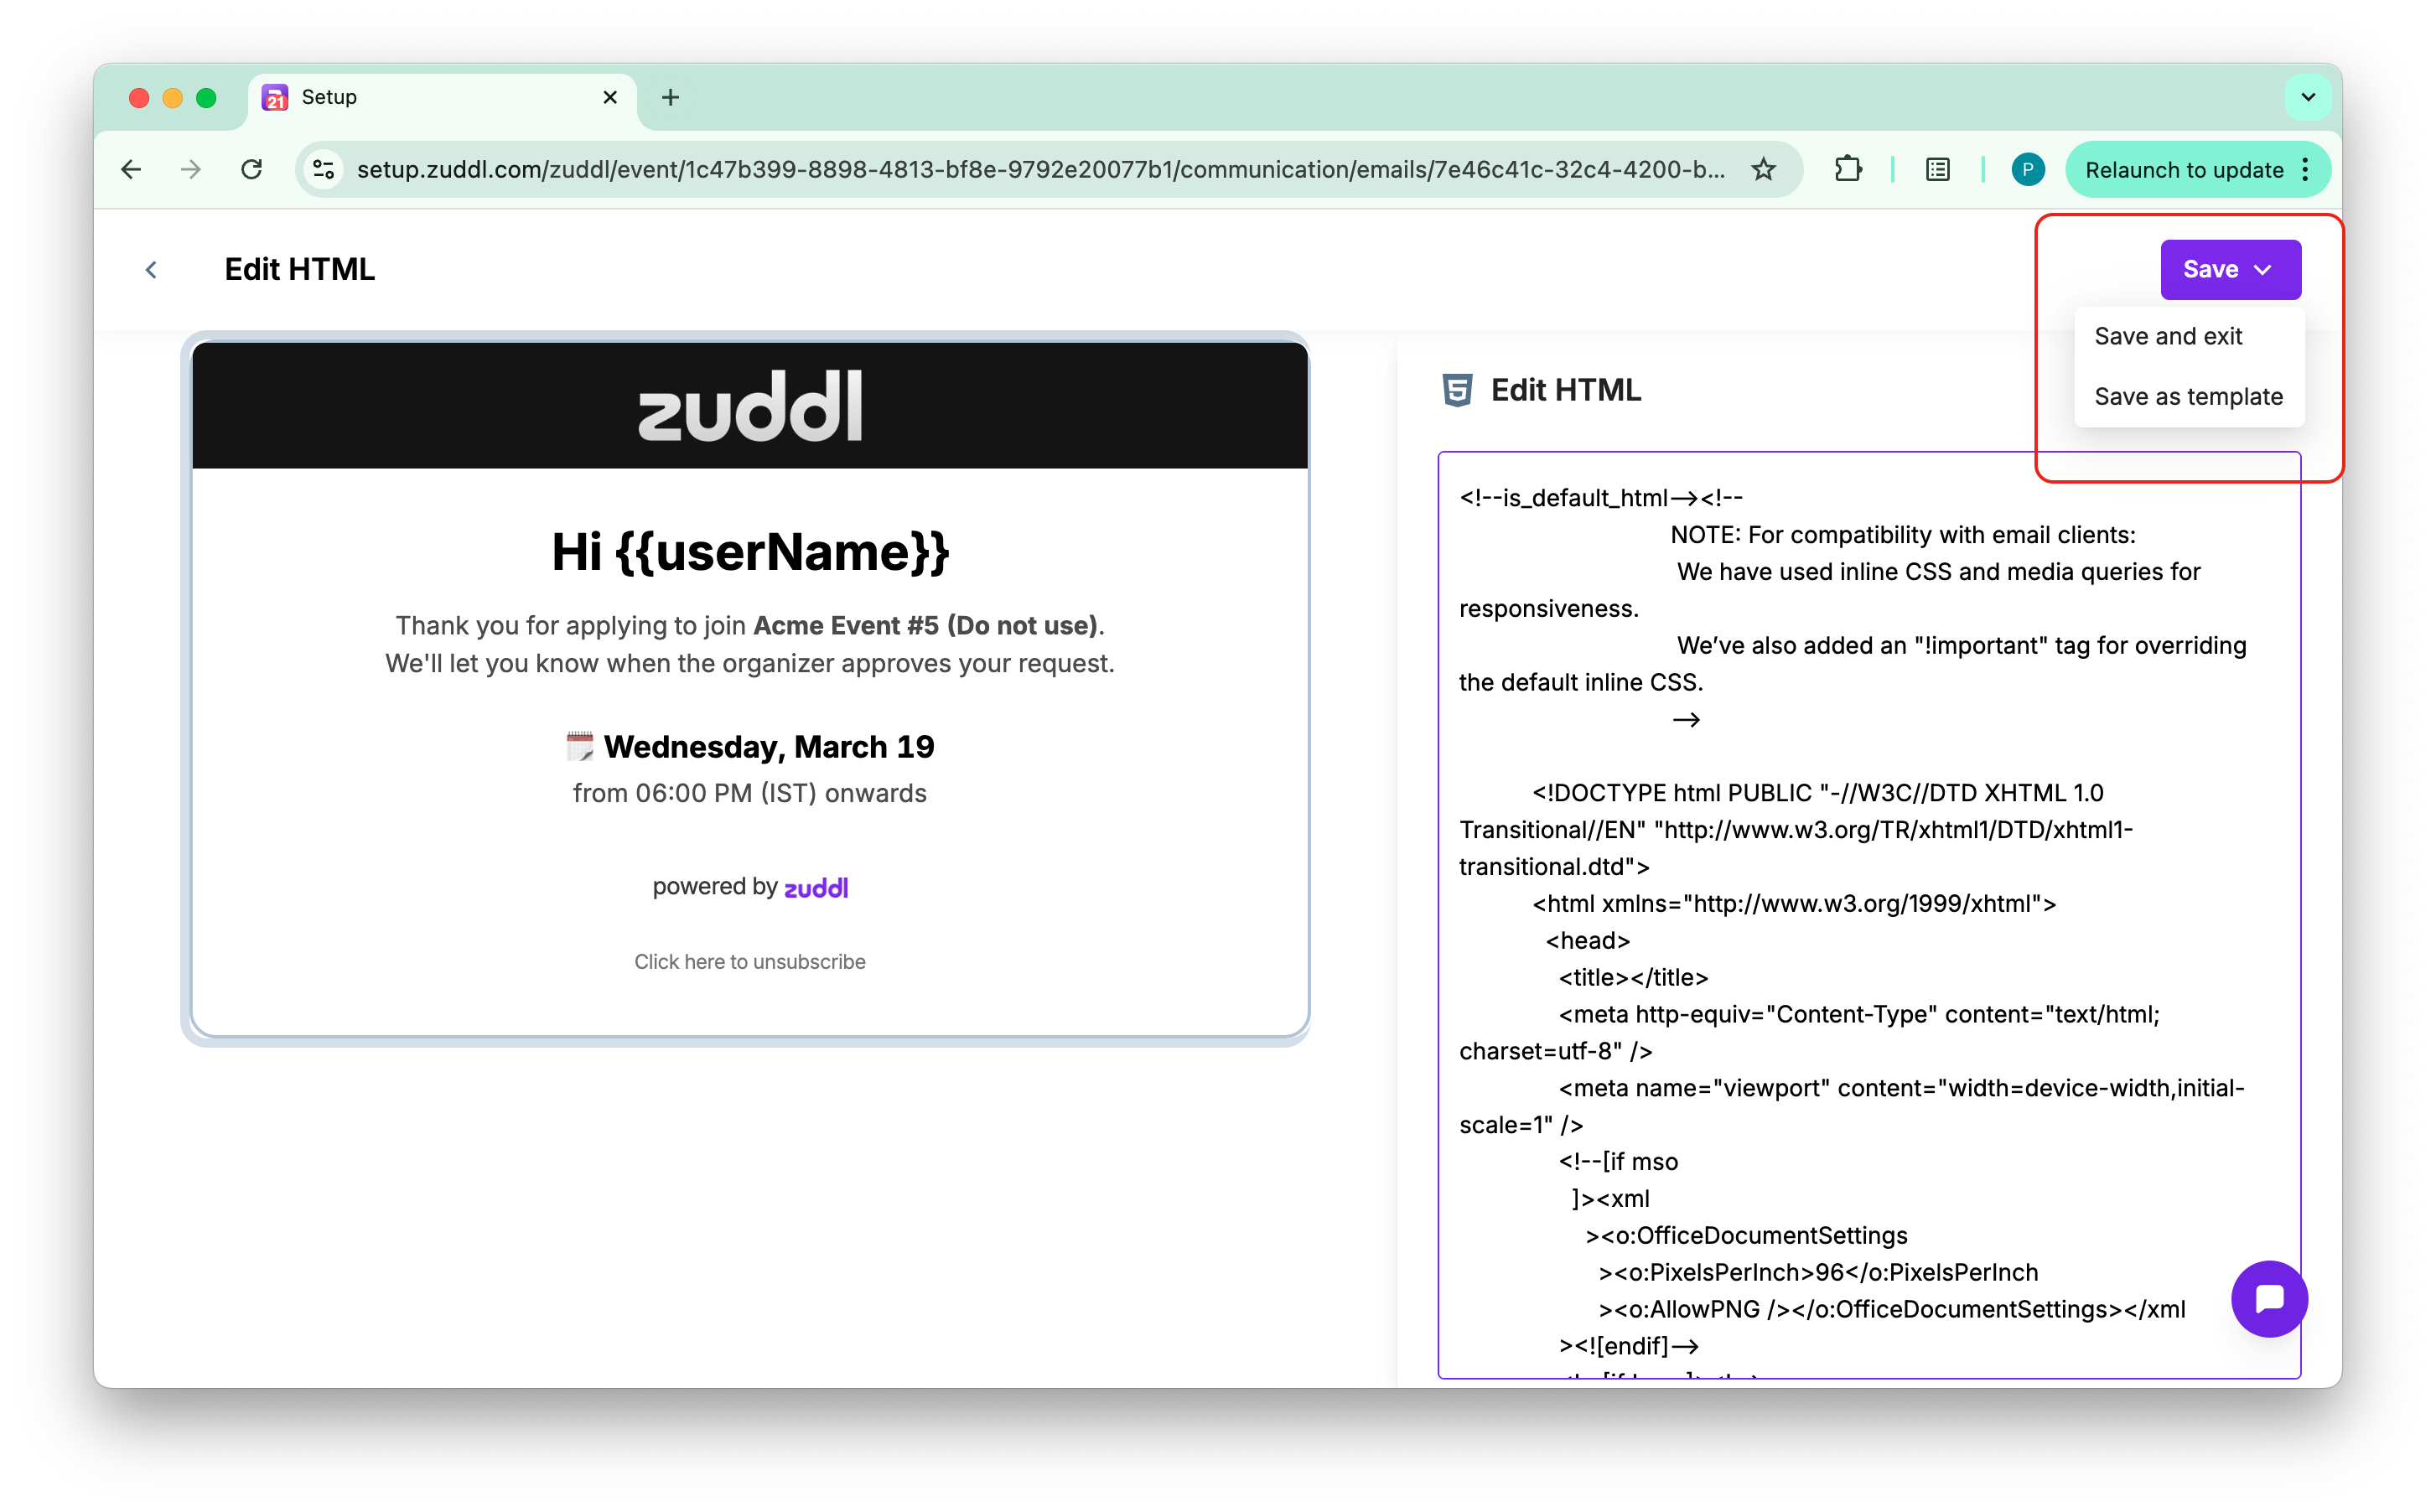
Save email: This option lets you save the changes for the email communication.
Save email template: This option lets you save the modified email as an event-level template or global template. To save the template, enter a Template name.
Saved templates
All the templates saved at the event-level are shown in the Saved template menu in the left navigation.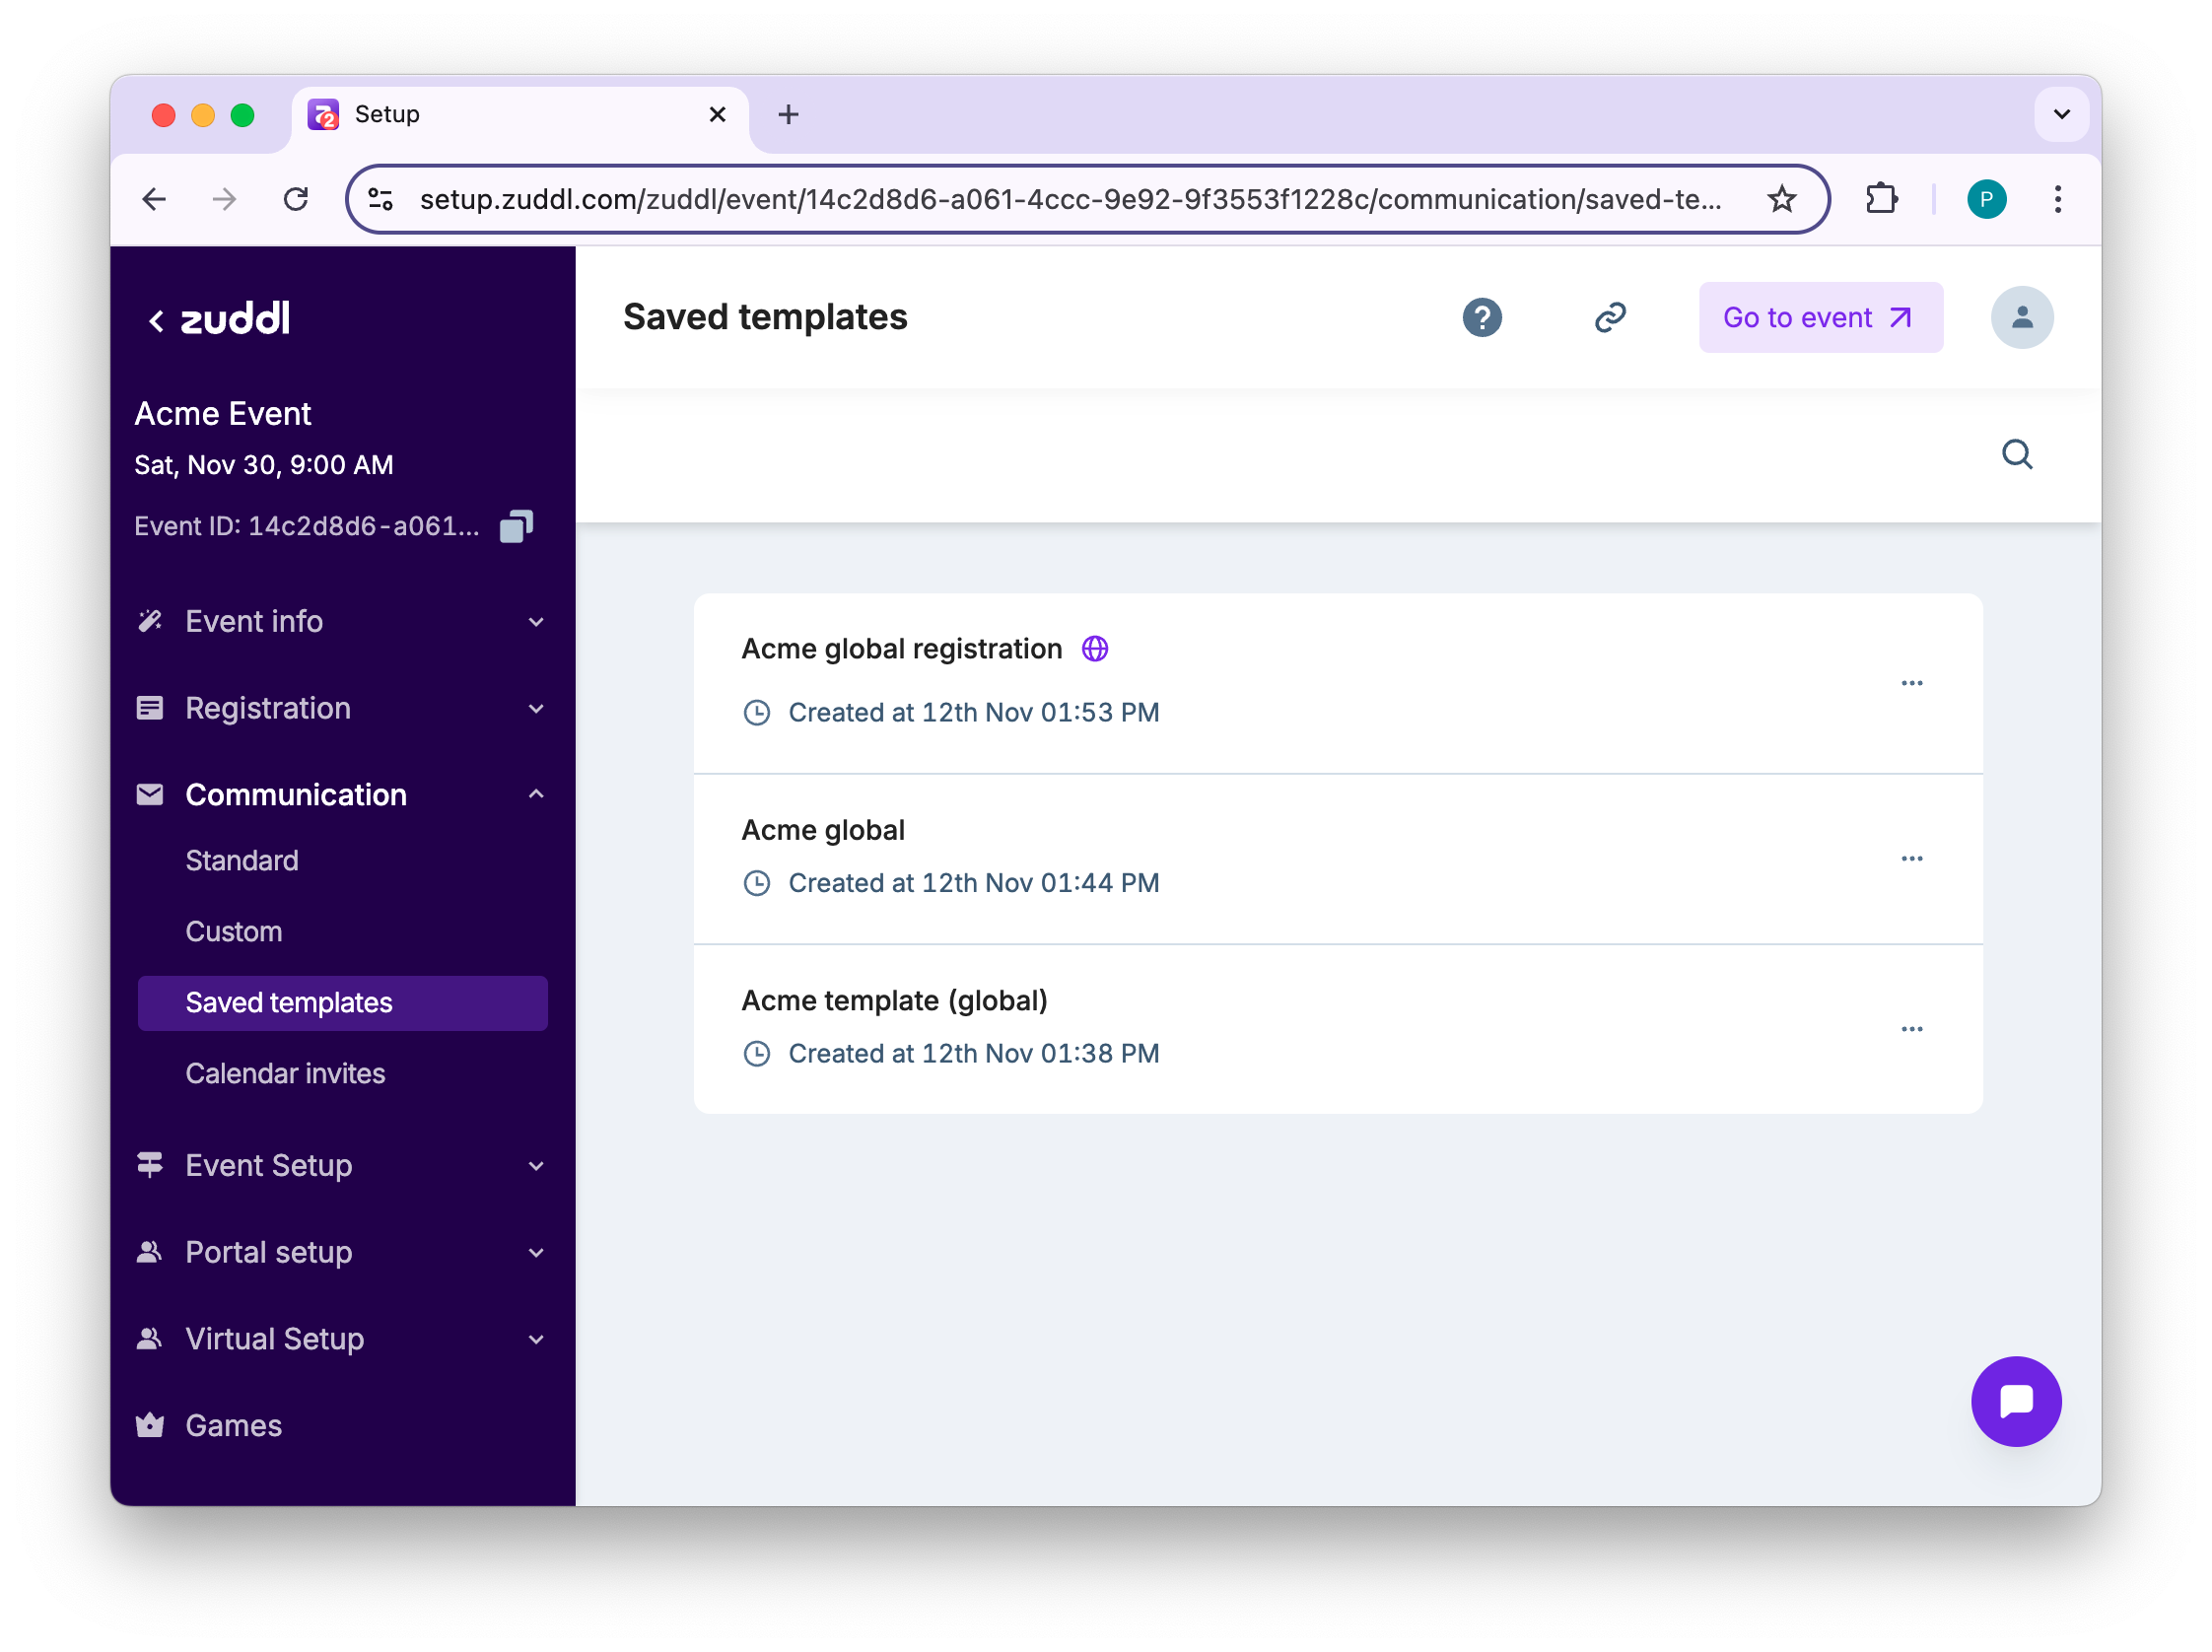
Click Save.
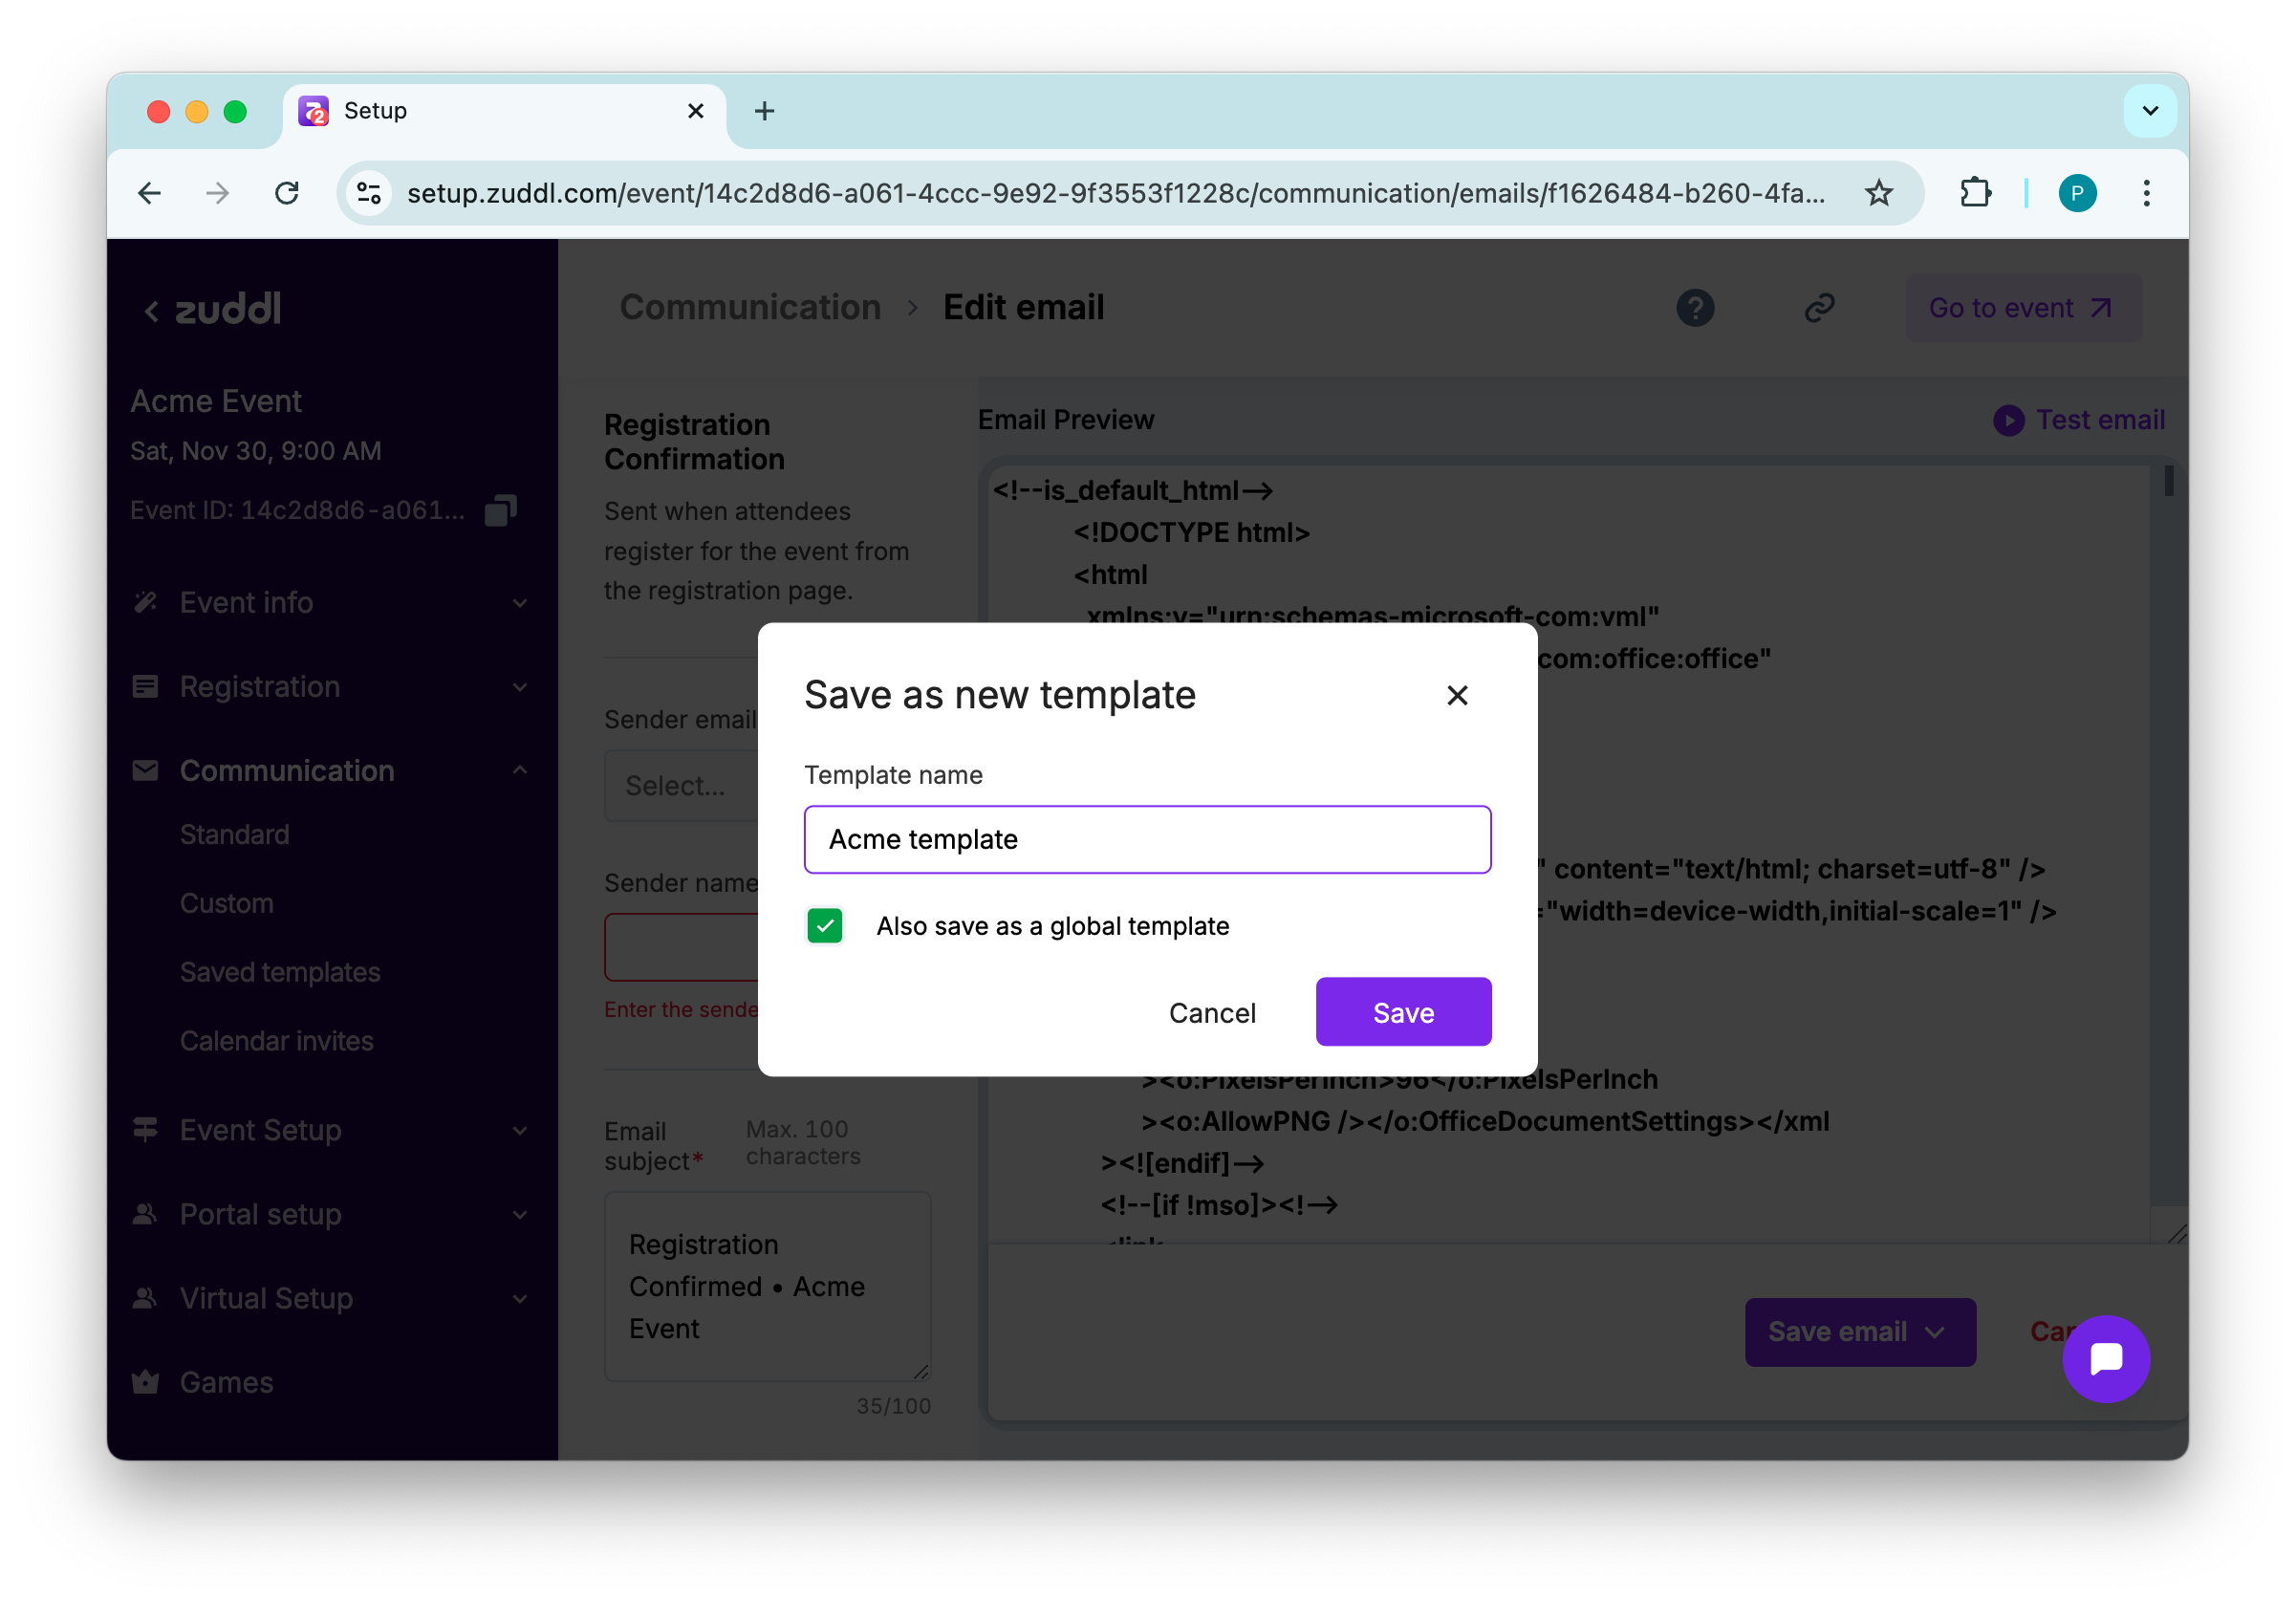
You can also select the 'Also save as a global template' checkbox to save the modified email as a template.
Not all global templates are available on the event templates page, but only the ones you save as a global template in an event.
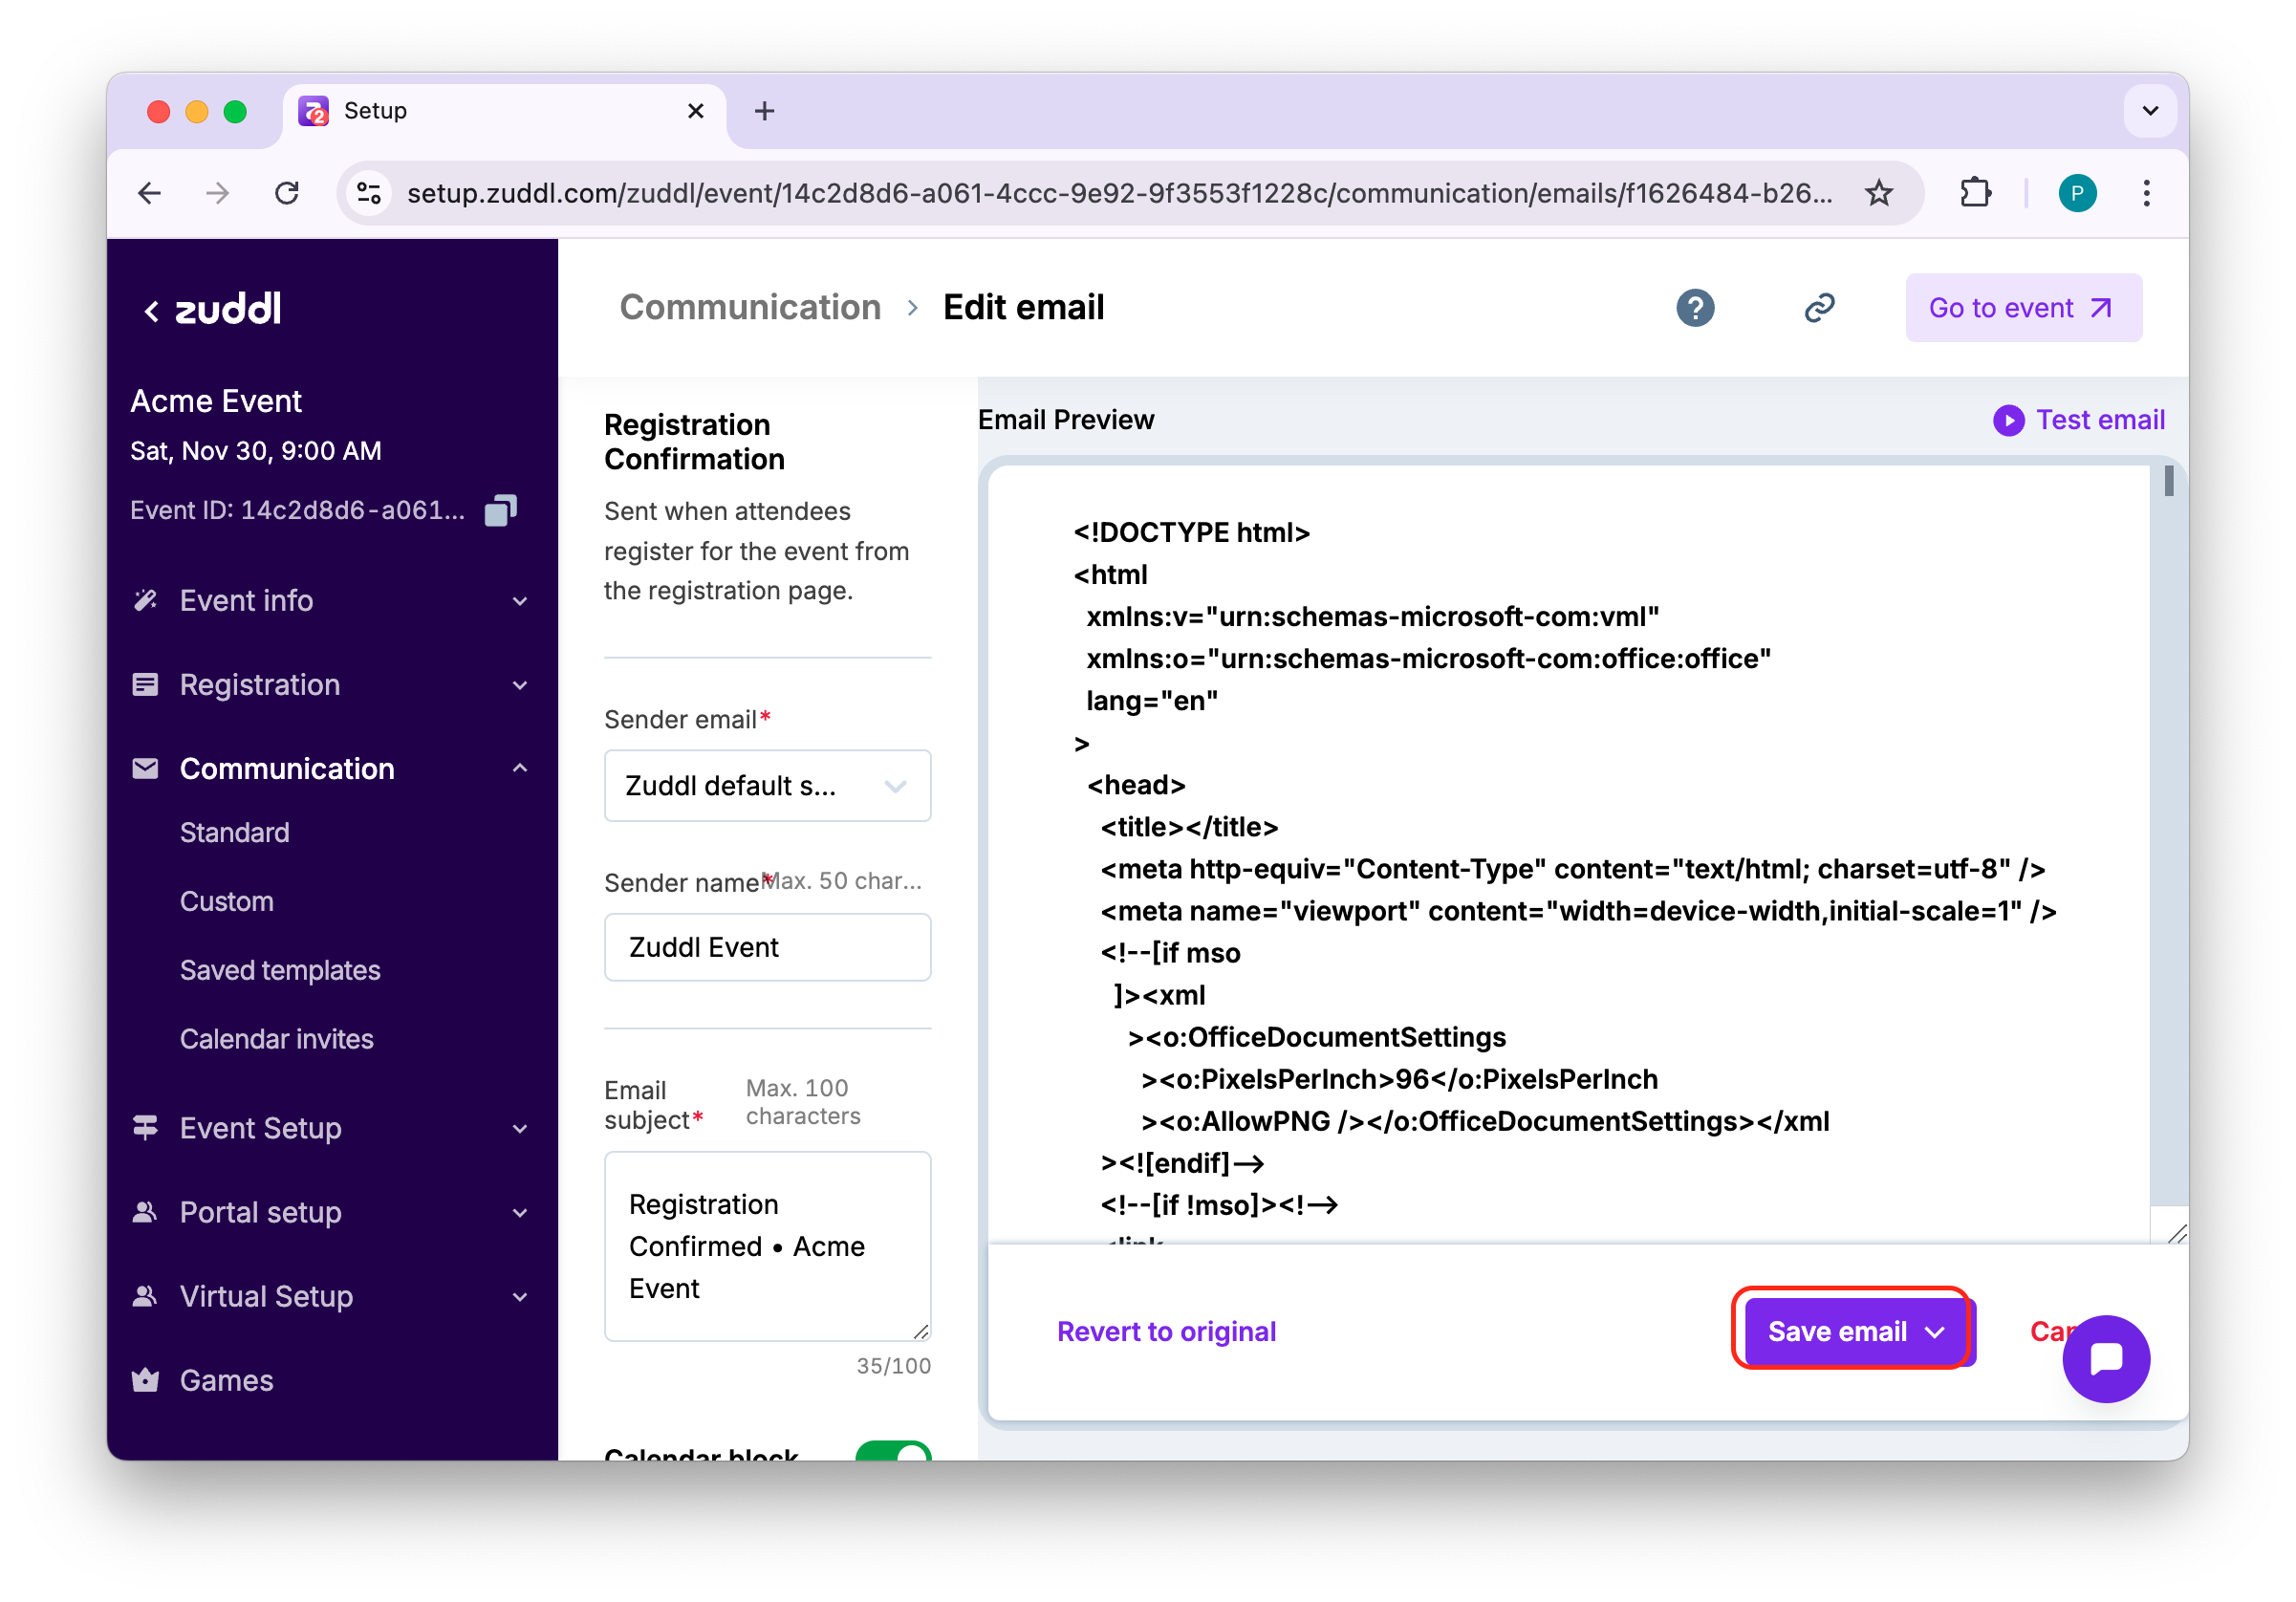
You can review the changes by clicking the Test email option at the top, which sends a custom email to your email address. If you want to restore the original template, click Revert to Original.
By clicking on the Revert to Original link, the email gets reverted to the default standard template.

You can go back to editing the custom code anytime by clicking Edit HTML code. In the same way, you can edit each email template according to your needs.
Important
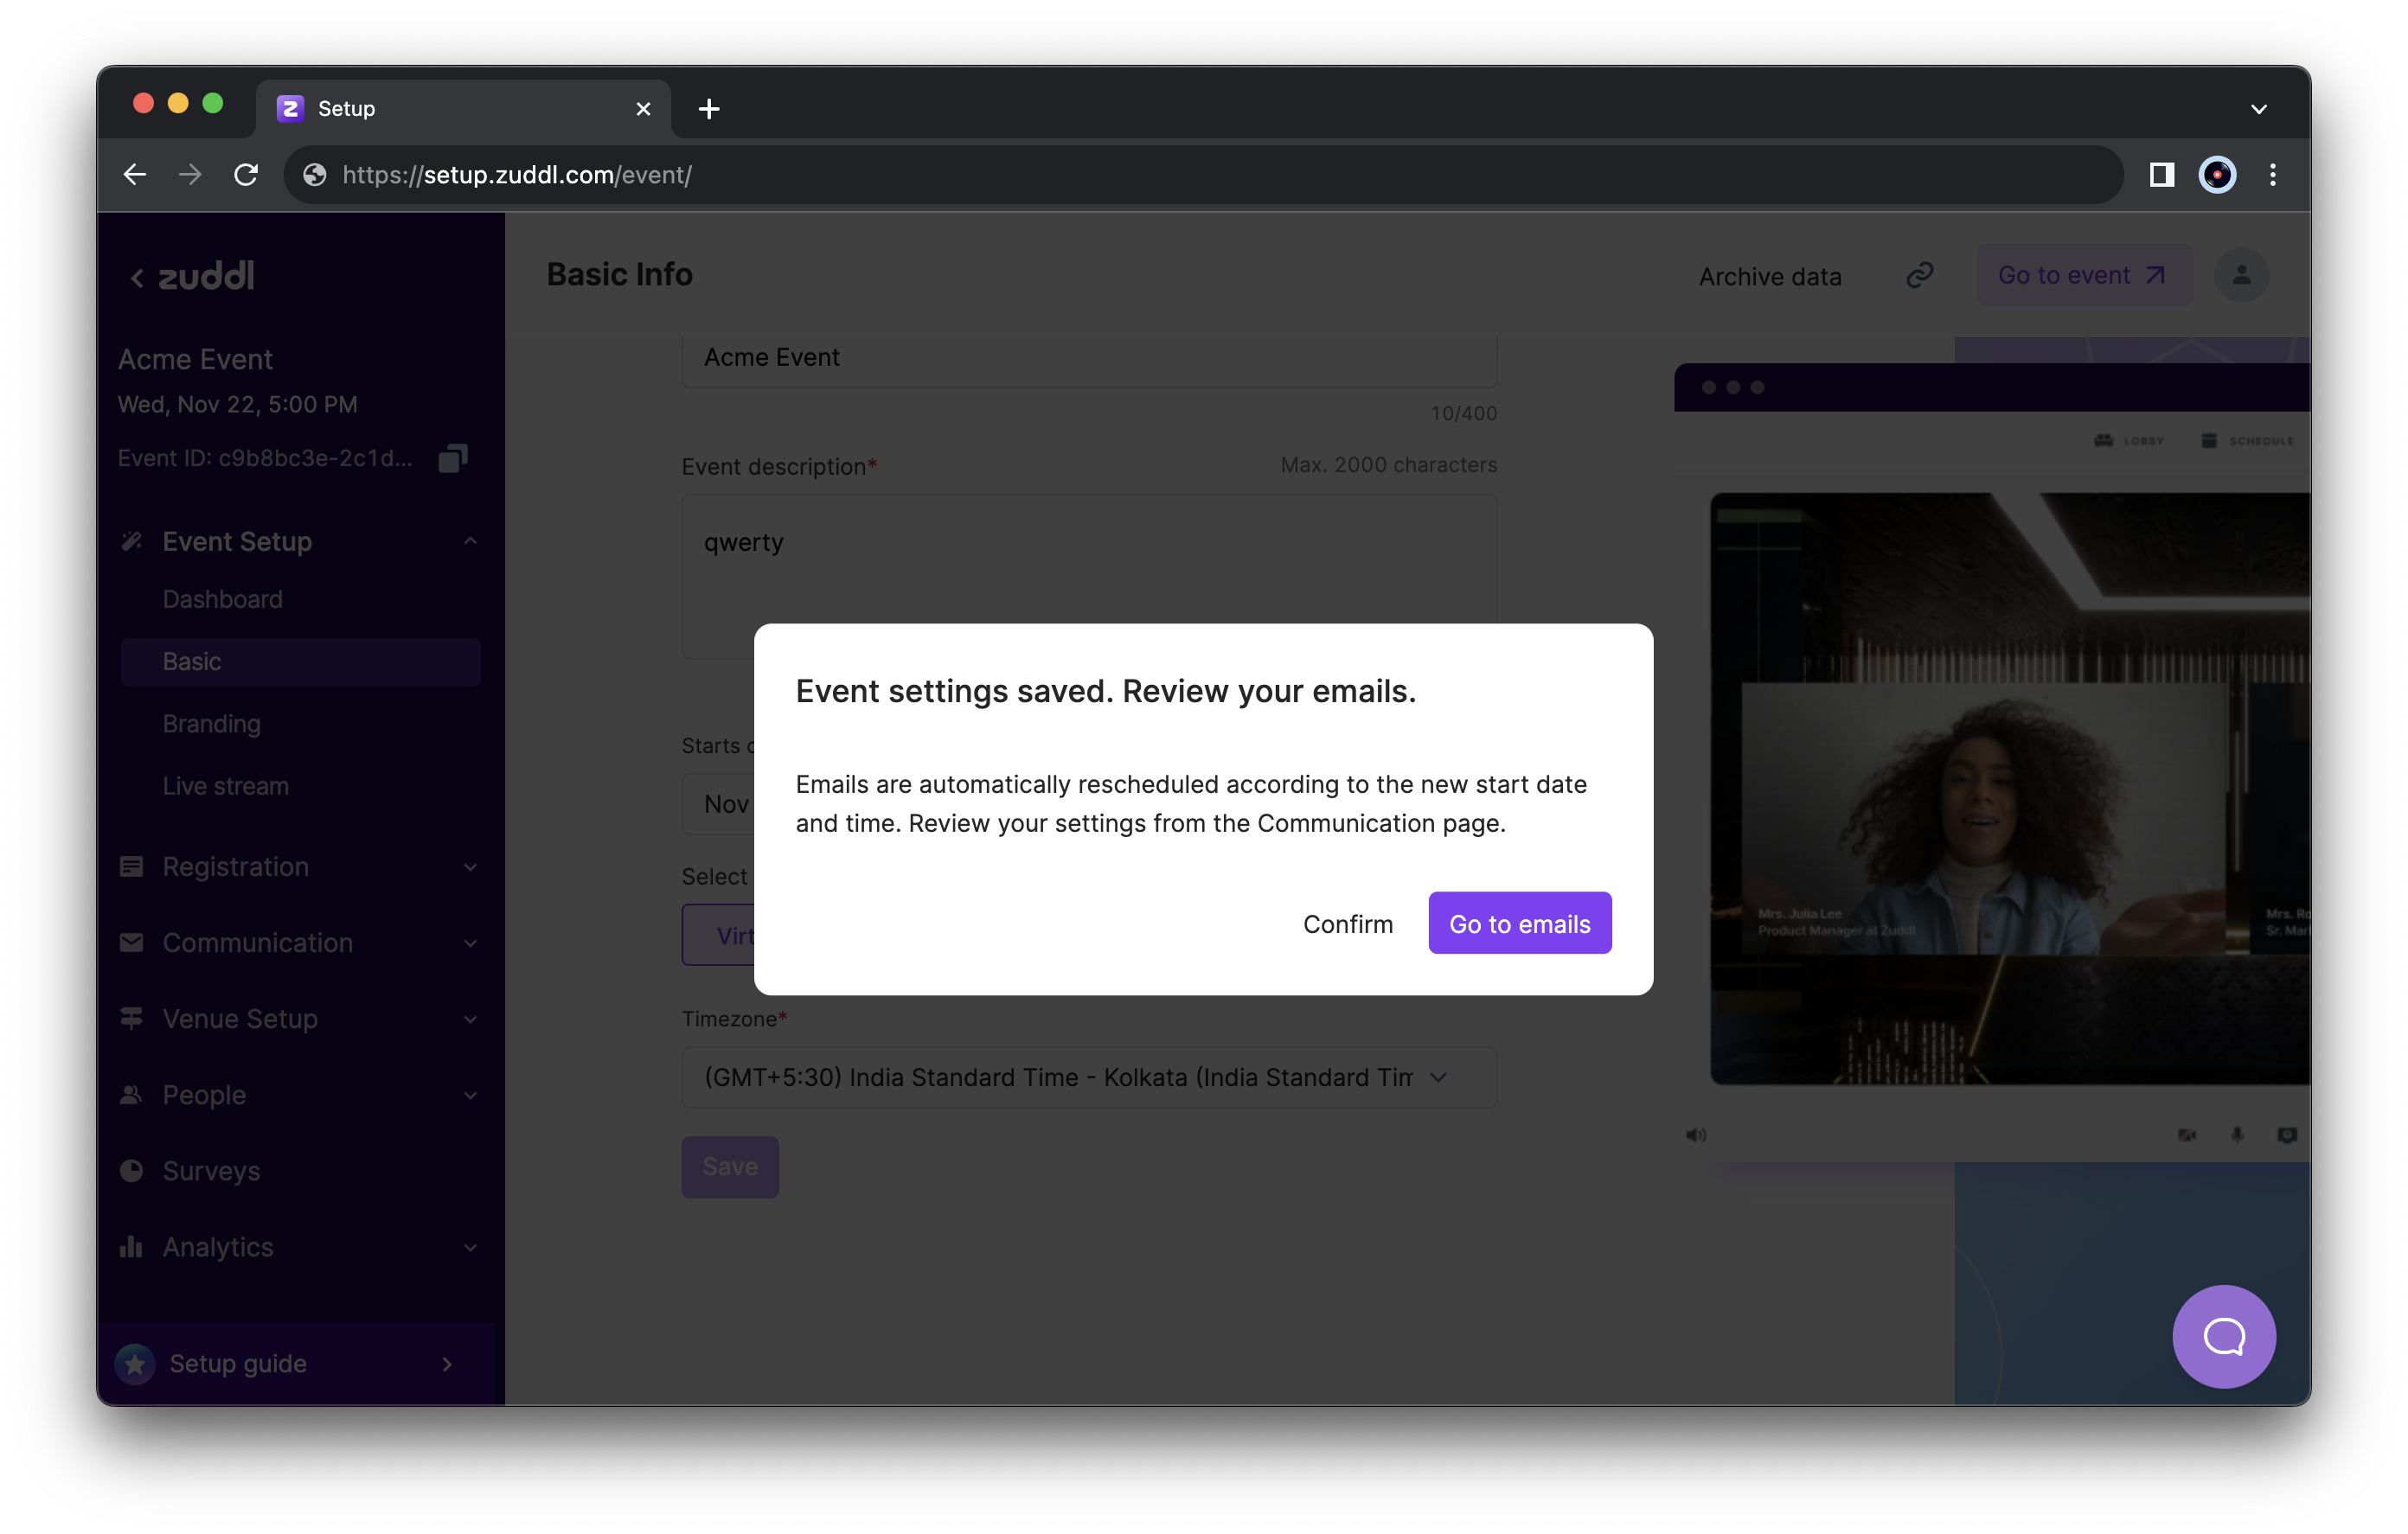
Changing the event date or time resets the email toggles to default.
So, if your registration confirmation email was toggled on, it gets turned off when the event dates are modified. You will be notified of this change via a popup or an email. This resetting is done to prevent any accidental misfires during trial runs. Conversely, changing the event date or time in the email does not change the event date or timing.
Build your email
You can also build your email yourself using email builder tool. Learn how to use the email builder too.