How to Set Up Discounts for your Virtual Event in Zuddl
Last updated: August 28, 2025
You can set up customized discounts to suit your event needs. These discounts can be applied over coupons, and purchasers can apply them for ticket purchases based on conditions that you can define.
Bulk Discounts
Follow these steps to set up bulk discounts for your event:
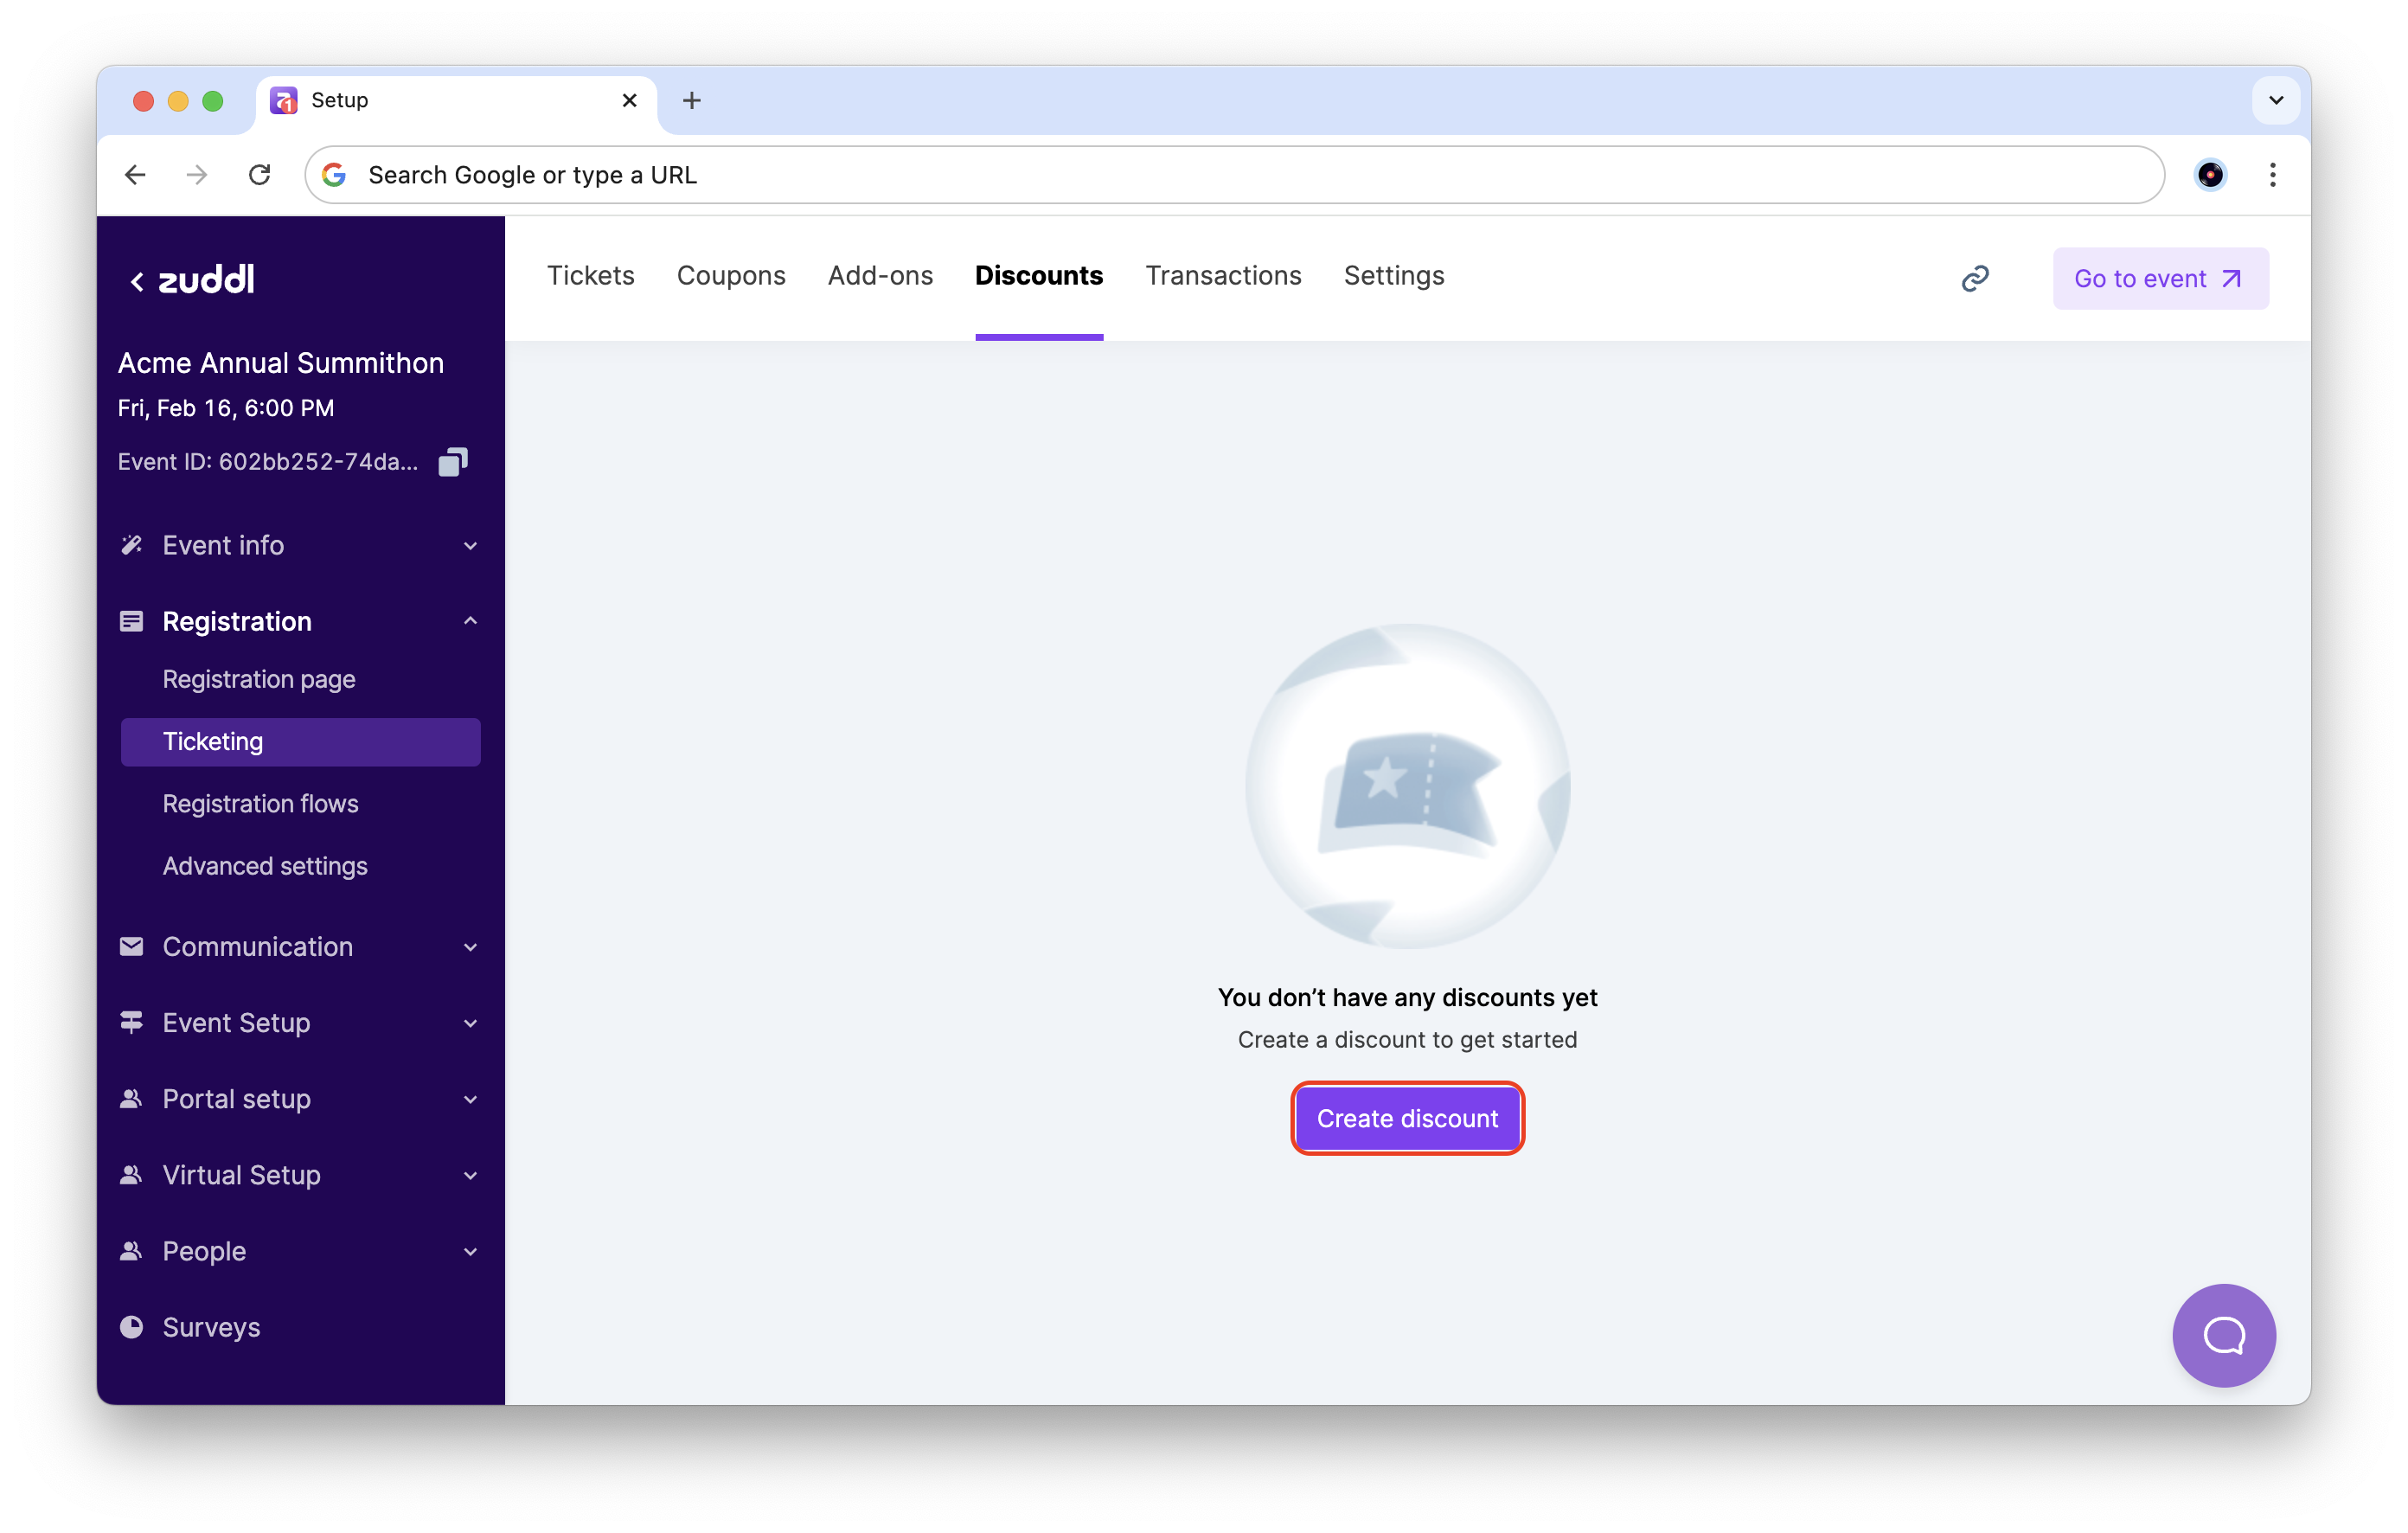
In the event setup, go to Registration > Ticketing > Discounts. To create a discount for the first time, click Create discount.
In the sidebar popup, select Bulk Discount.
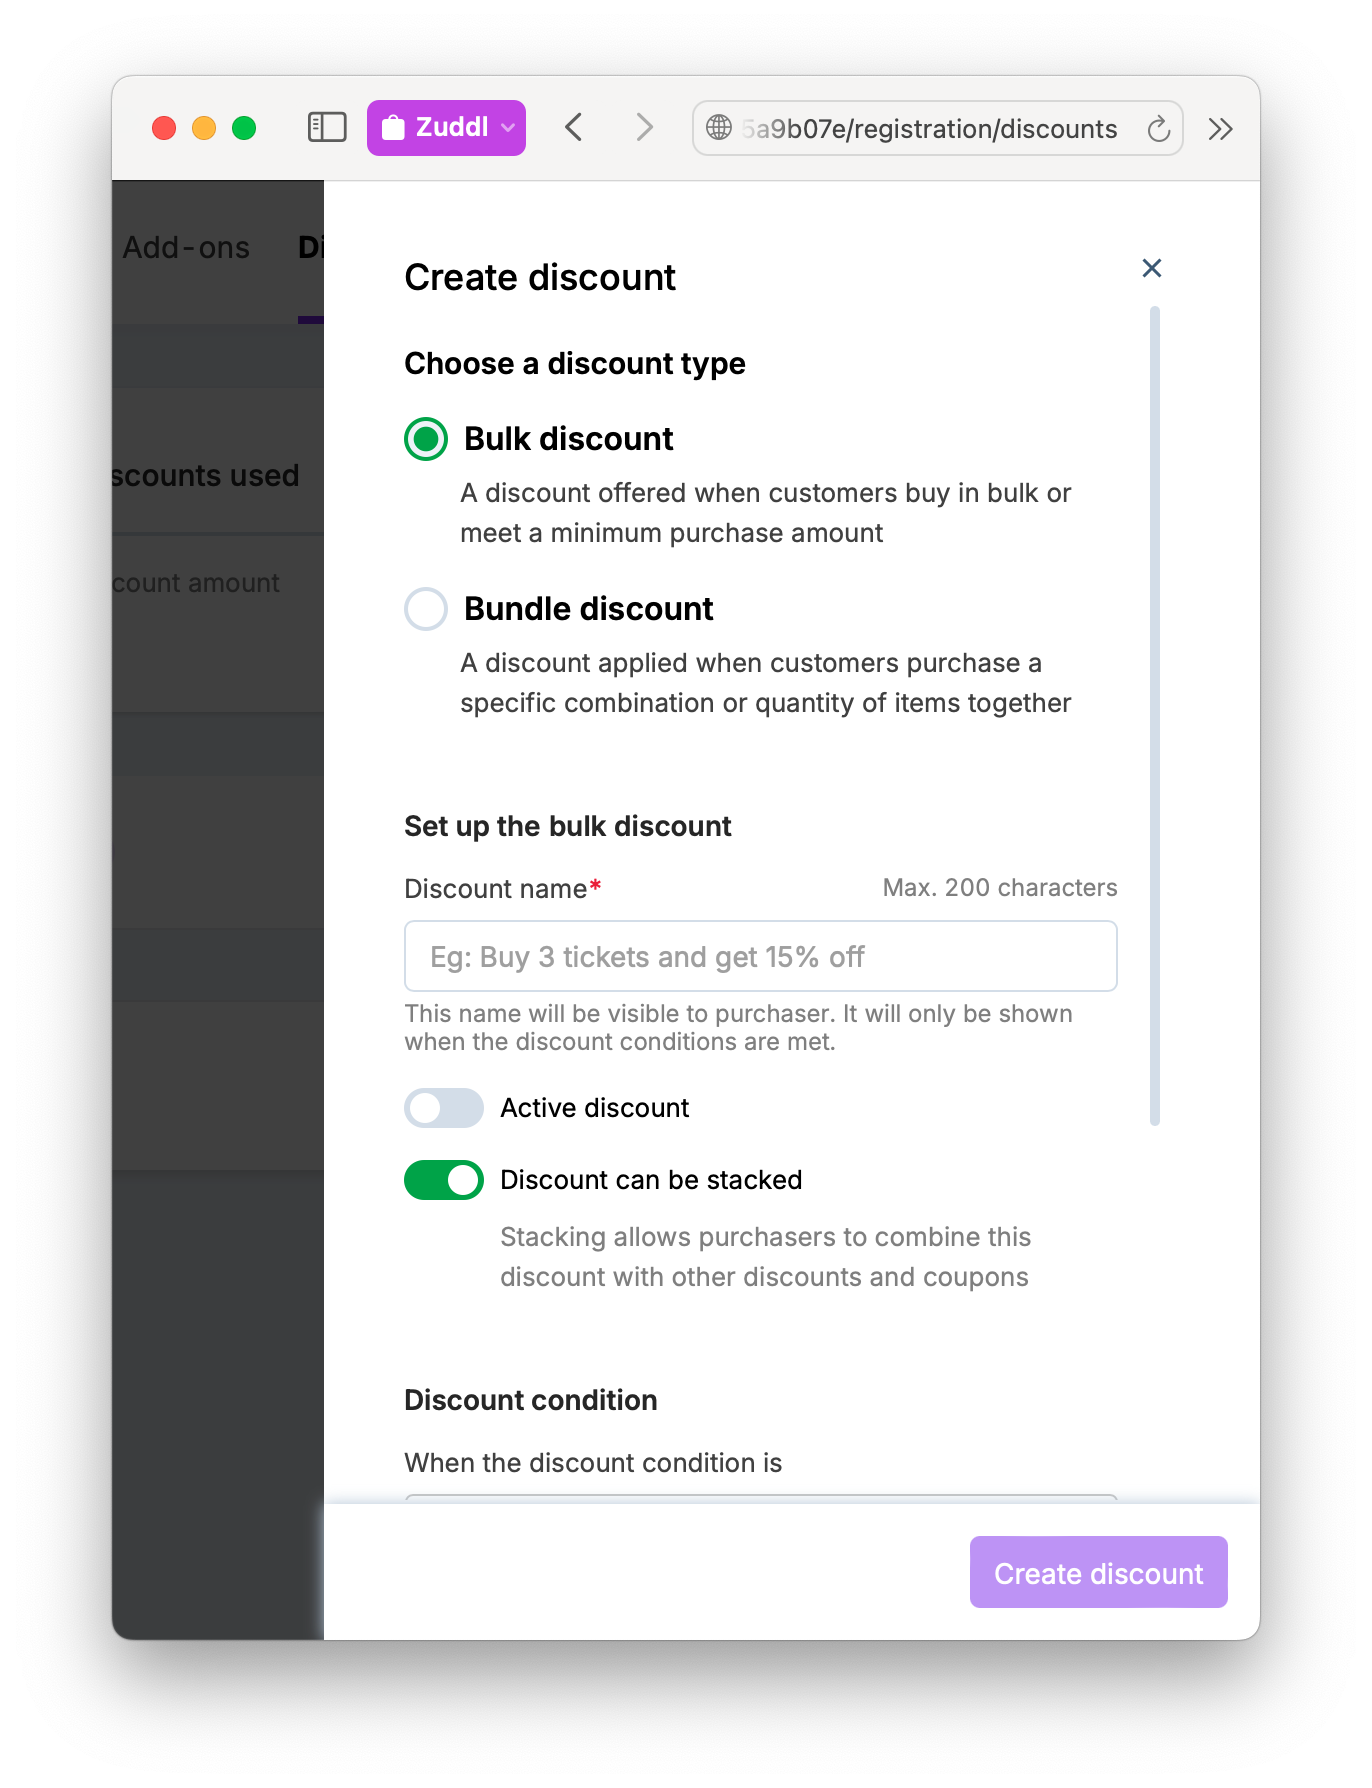
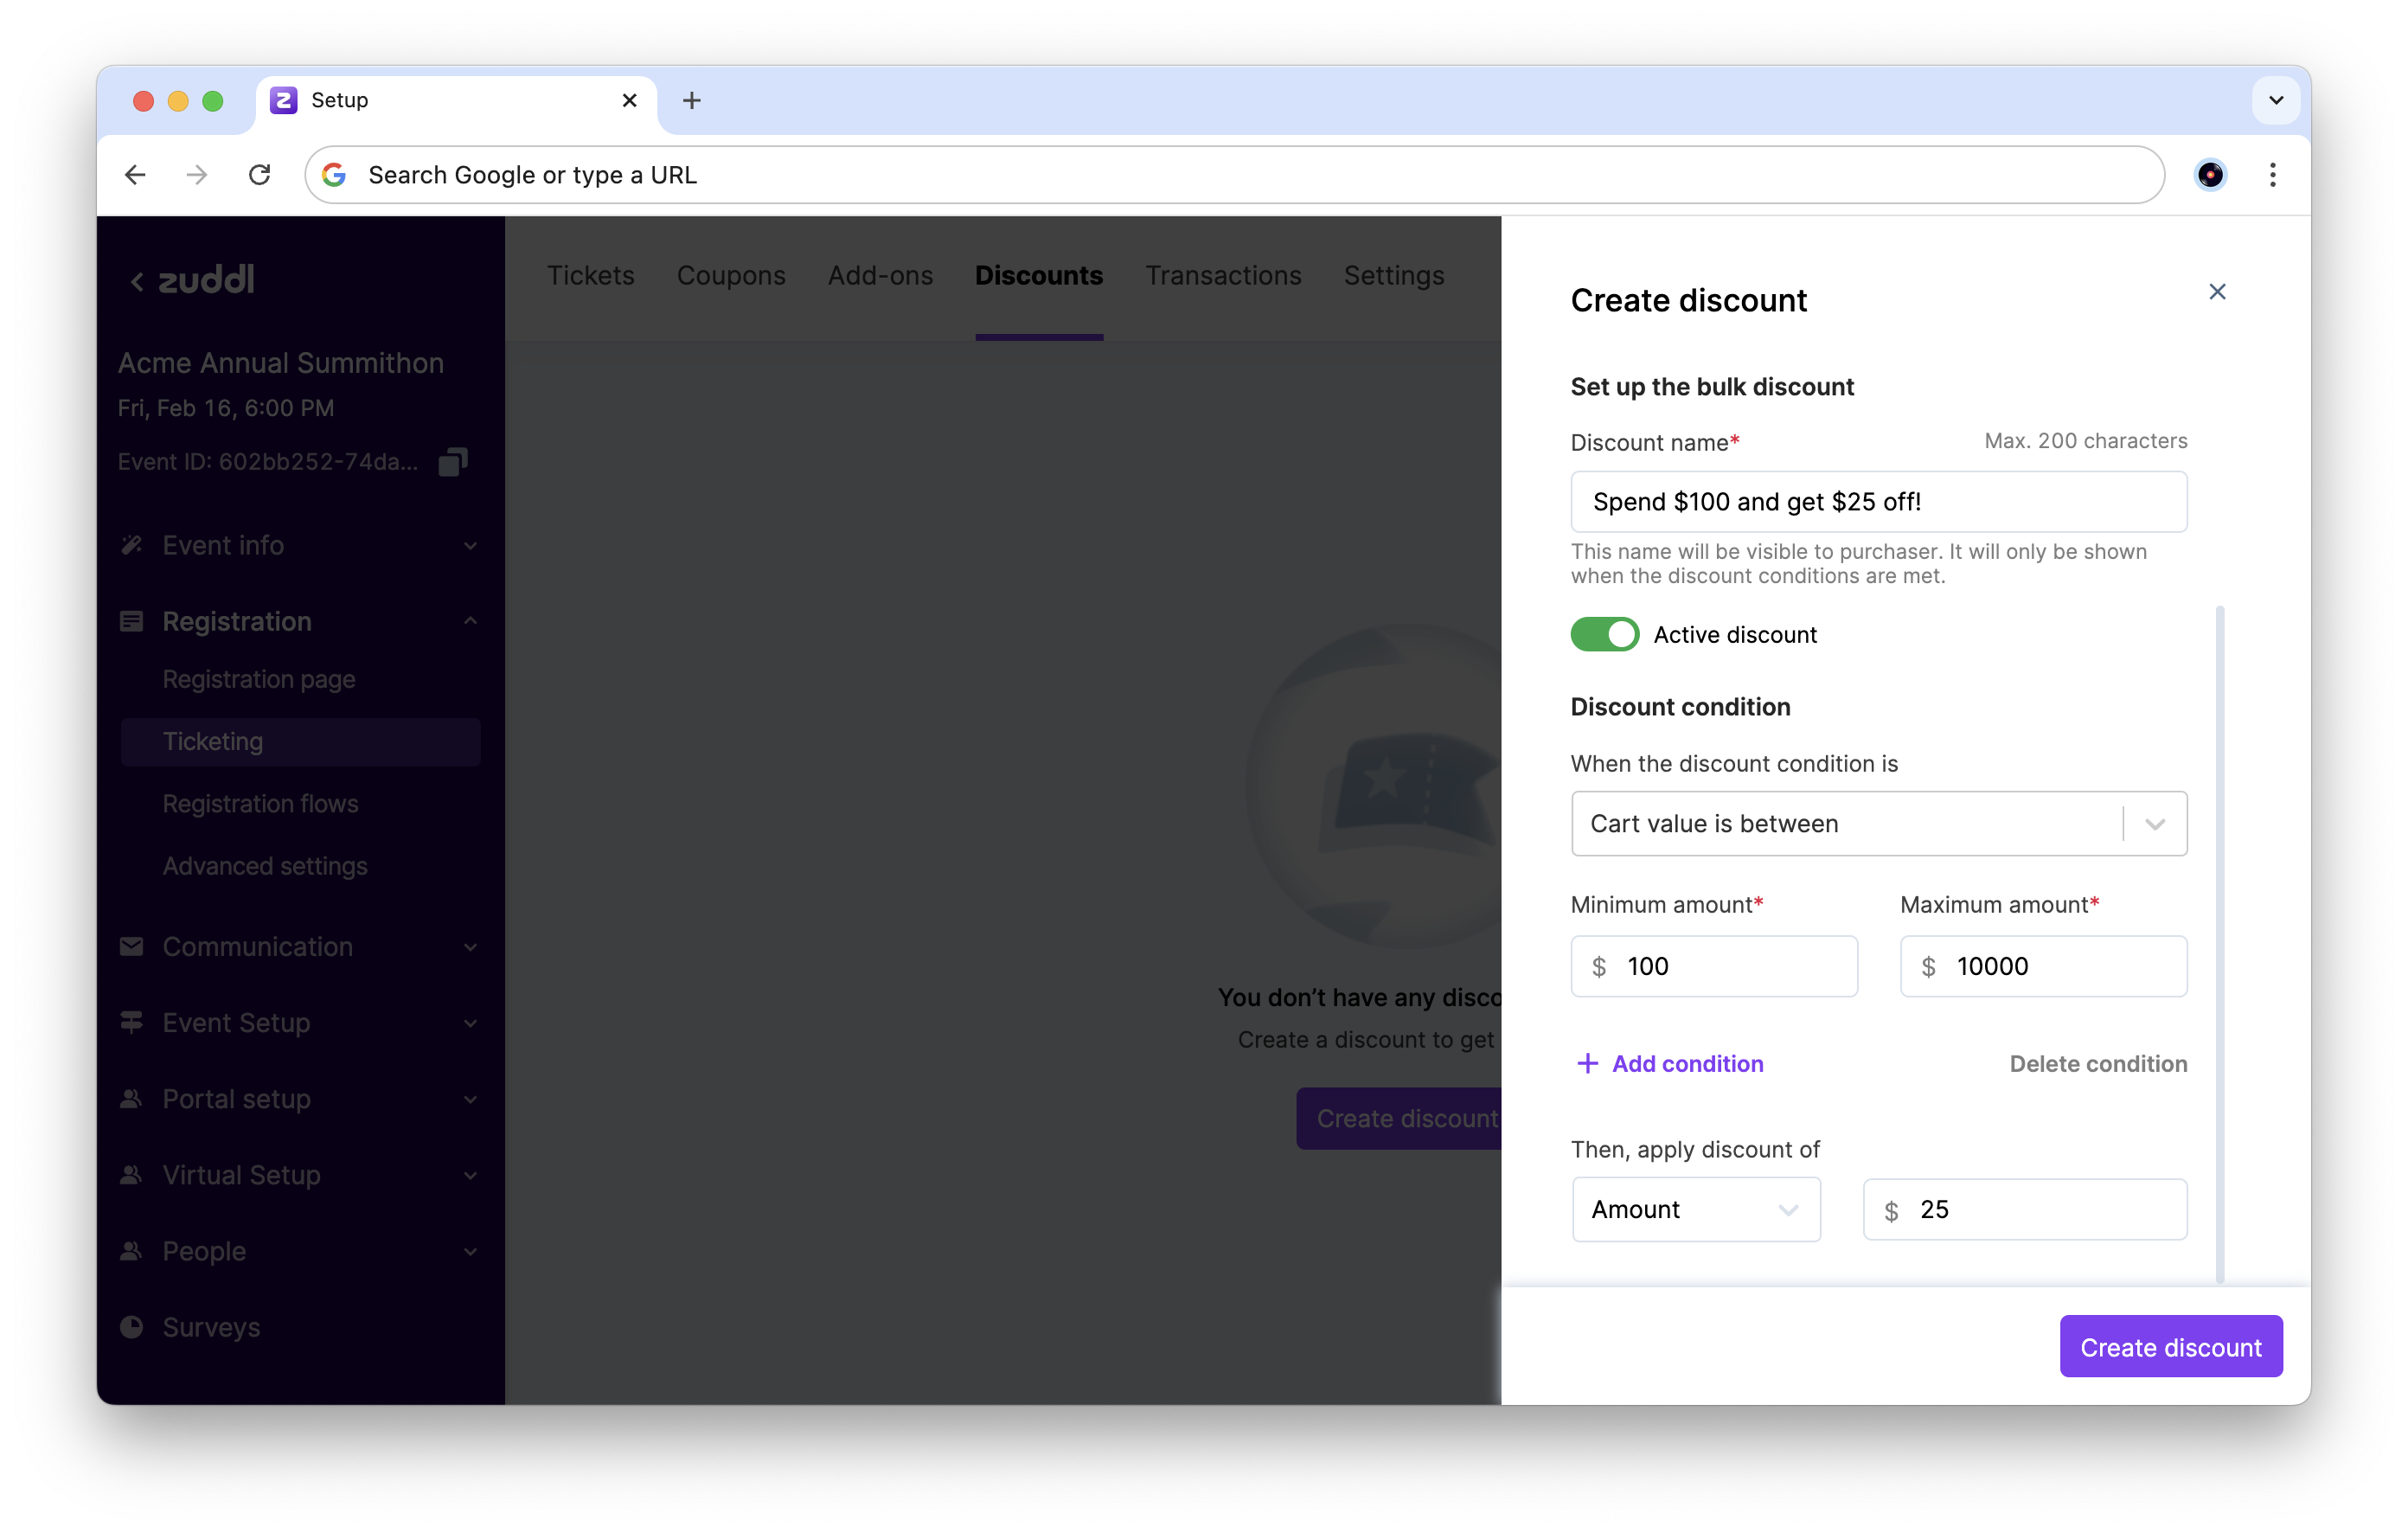
Enter a Discount name (up to 200 characters).
Toggle on Active discount to make this discount usable to purchasers.
Optional. Toggle off Discount can be stacked option. This option is only available for events with Zuddl native ticketing. The stacking functionality is turned on by default for all events. Reach out to support@zuddl.com to have this enabled for your event.
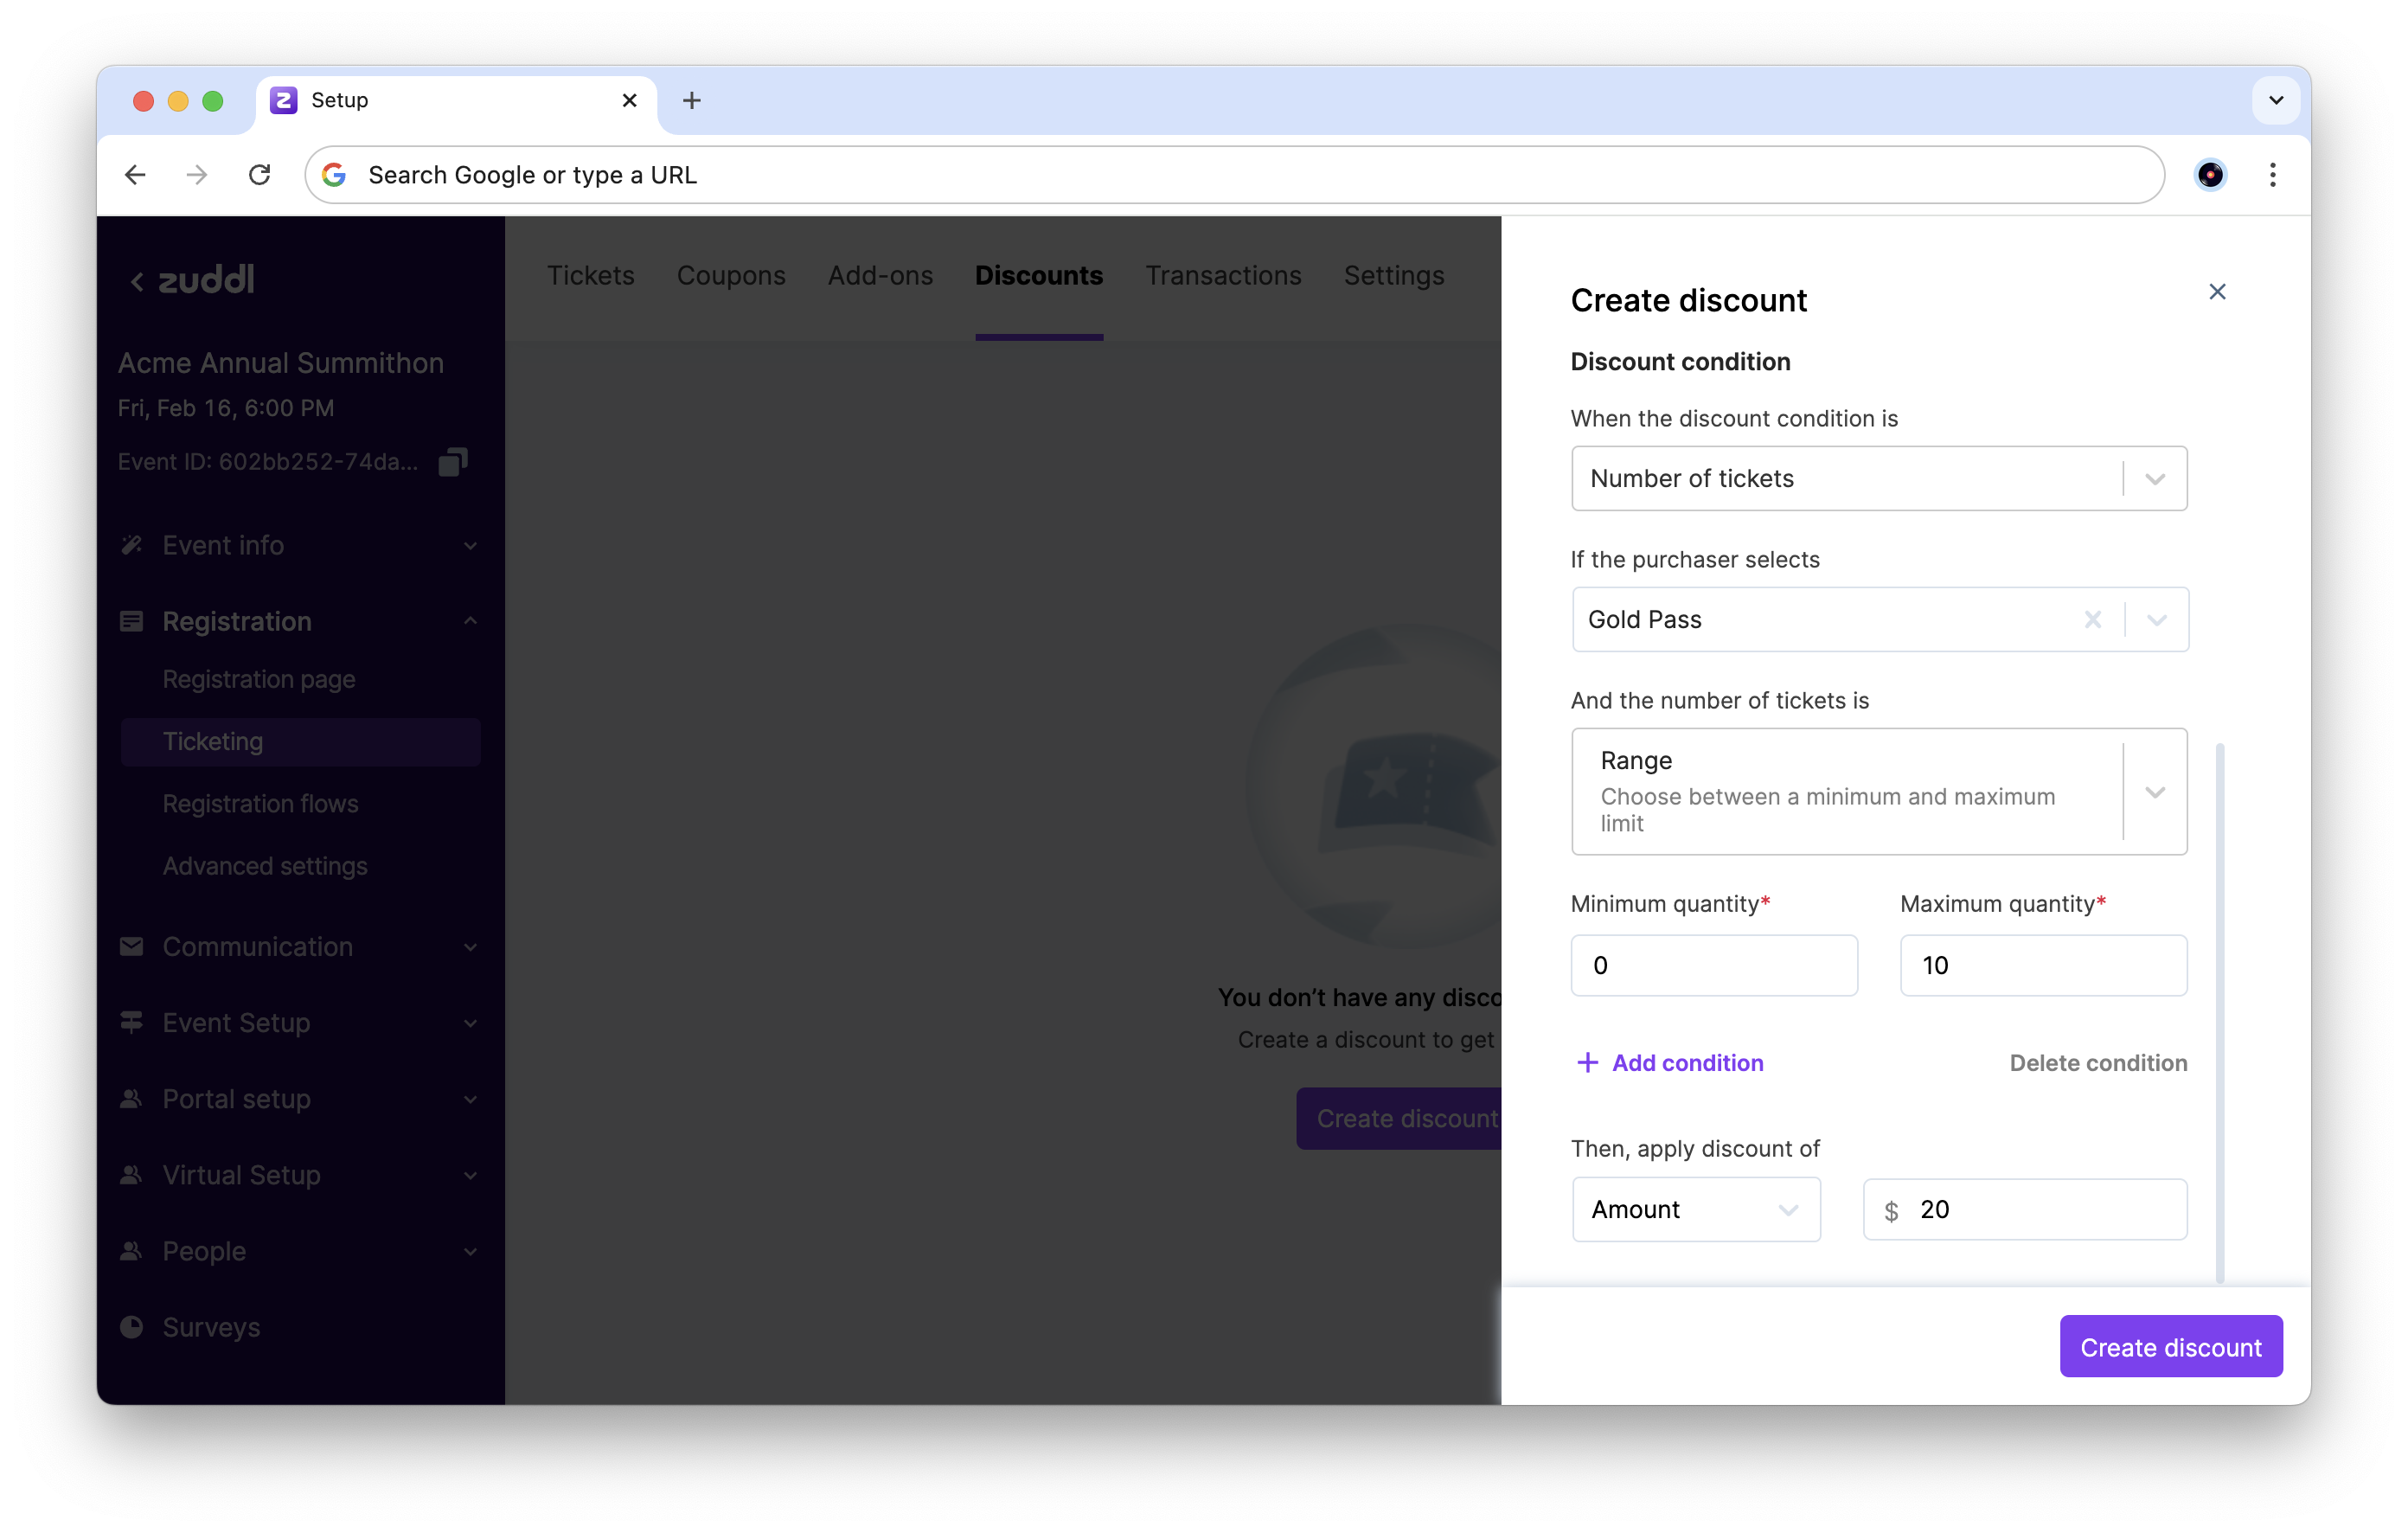
Learn how to use discount stacking.In Discount condition, you can set up the condition to apply this discount. Under When the discount condition is, select one of two options:
Number of tickets: This lets you choose a fixed number or range of tickets of tickets for which the discount is applied.
In the If the purchaser sdsselects field, choose the tickets to use for this condition.
In the And the number of tickets is field, choose one of two options:
Range: Choose between a minimum and a maximum number of tickets that need to be purchased to apply the discount. If selecting this option, enter the Minimum quantity and Maximum quantity of tickets to define this range.
Exact number: Define an exact number of tickets that need to be purchased to apply the discount.
Cart value is between: This lets you define two limits (minimum and maximum), and the discount is applied if the cart value is between these limits. Enter the Minimum amount and Maximum amount of cart value to define this range.

To add more conditions for this discount, click + Add condition.

In the Then, apply discount of field, choose the type of discount (Amount or Percentage) and enter the value.
Click Create discount to save these details and create a new bulk discount.
The discount is now listed in the Discounts tab. You can click the more options (3-dots) button to either Edit or Delete a created discount.
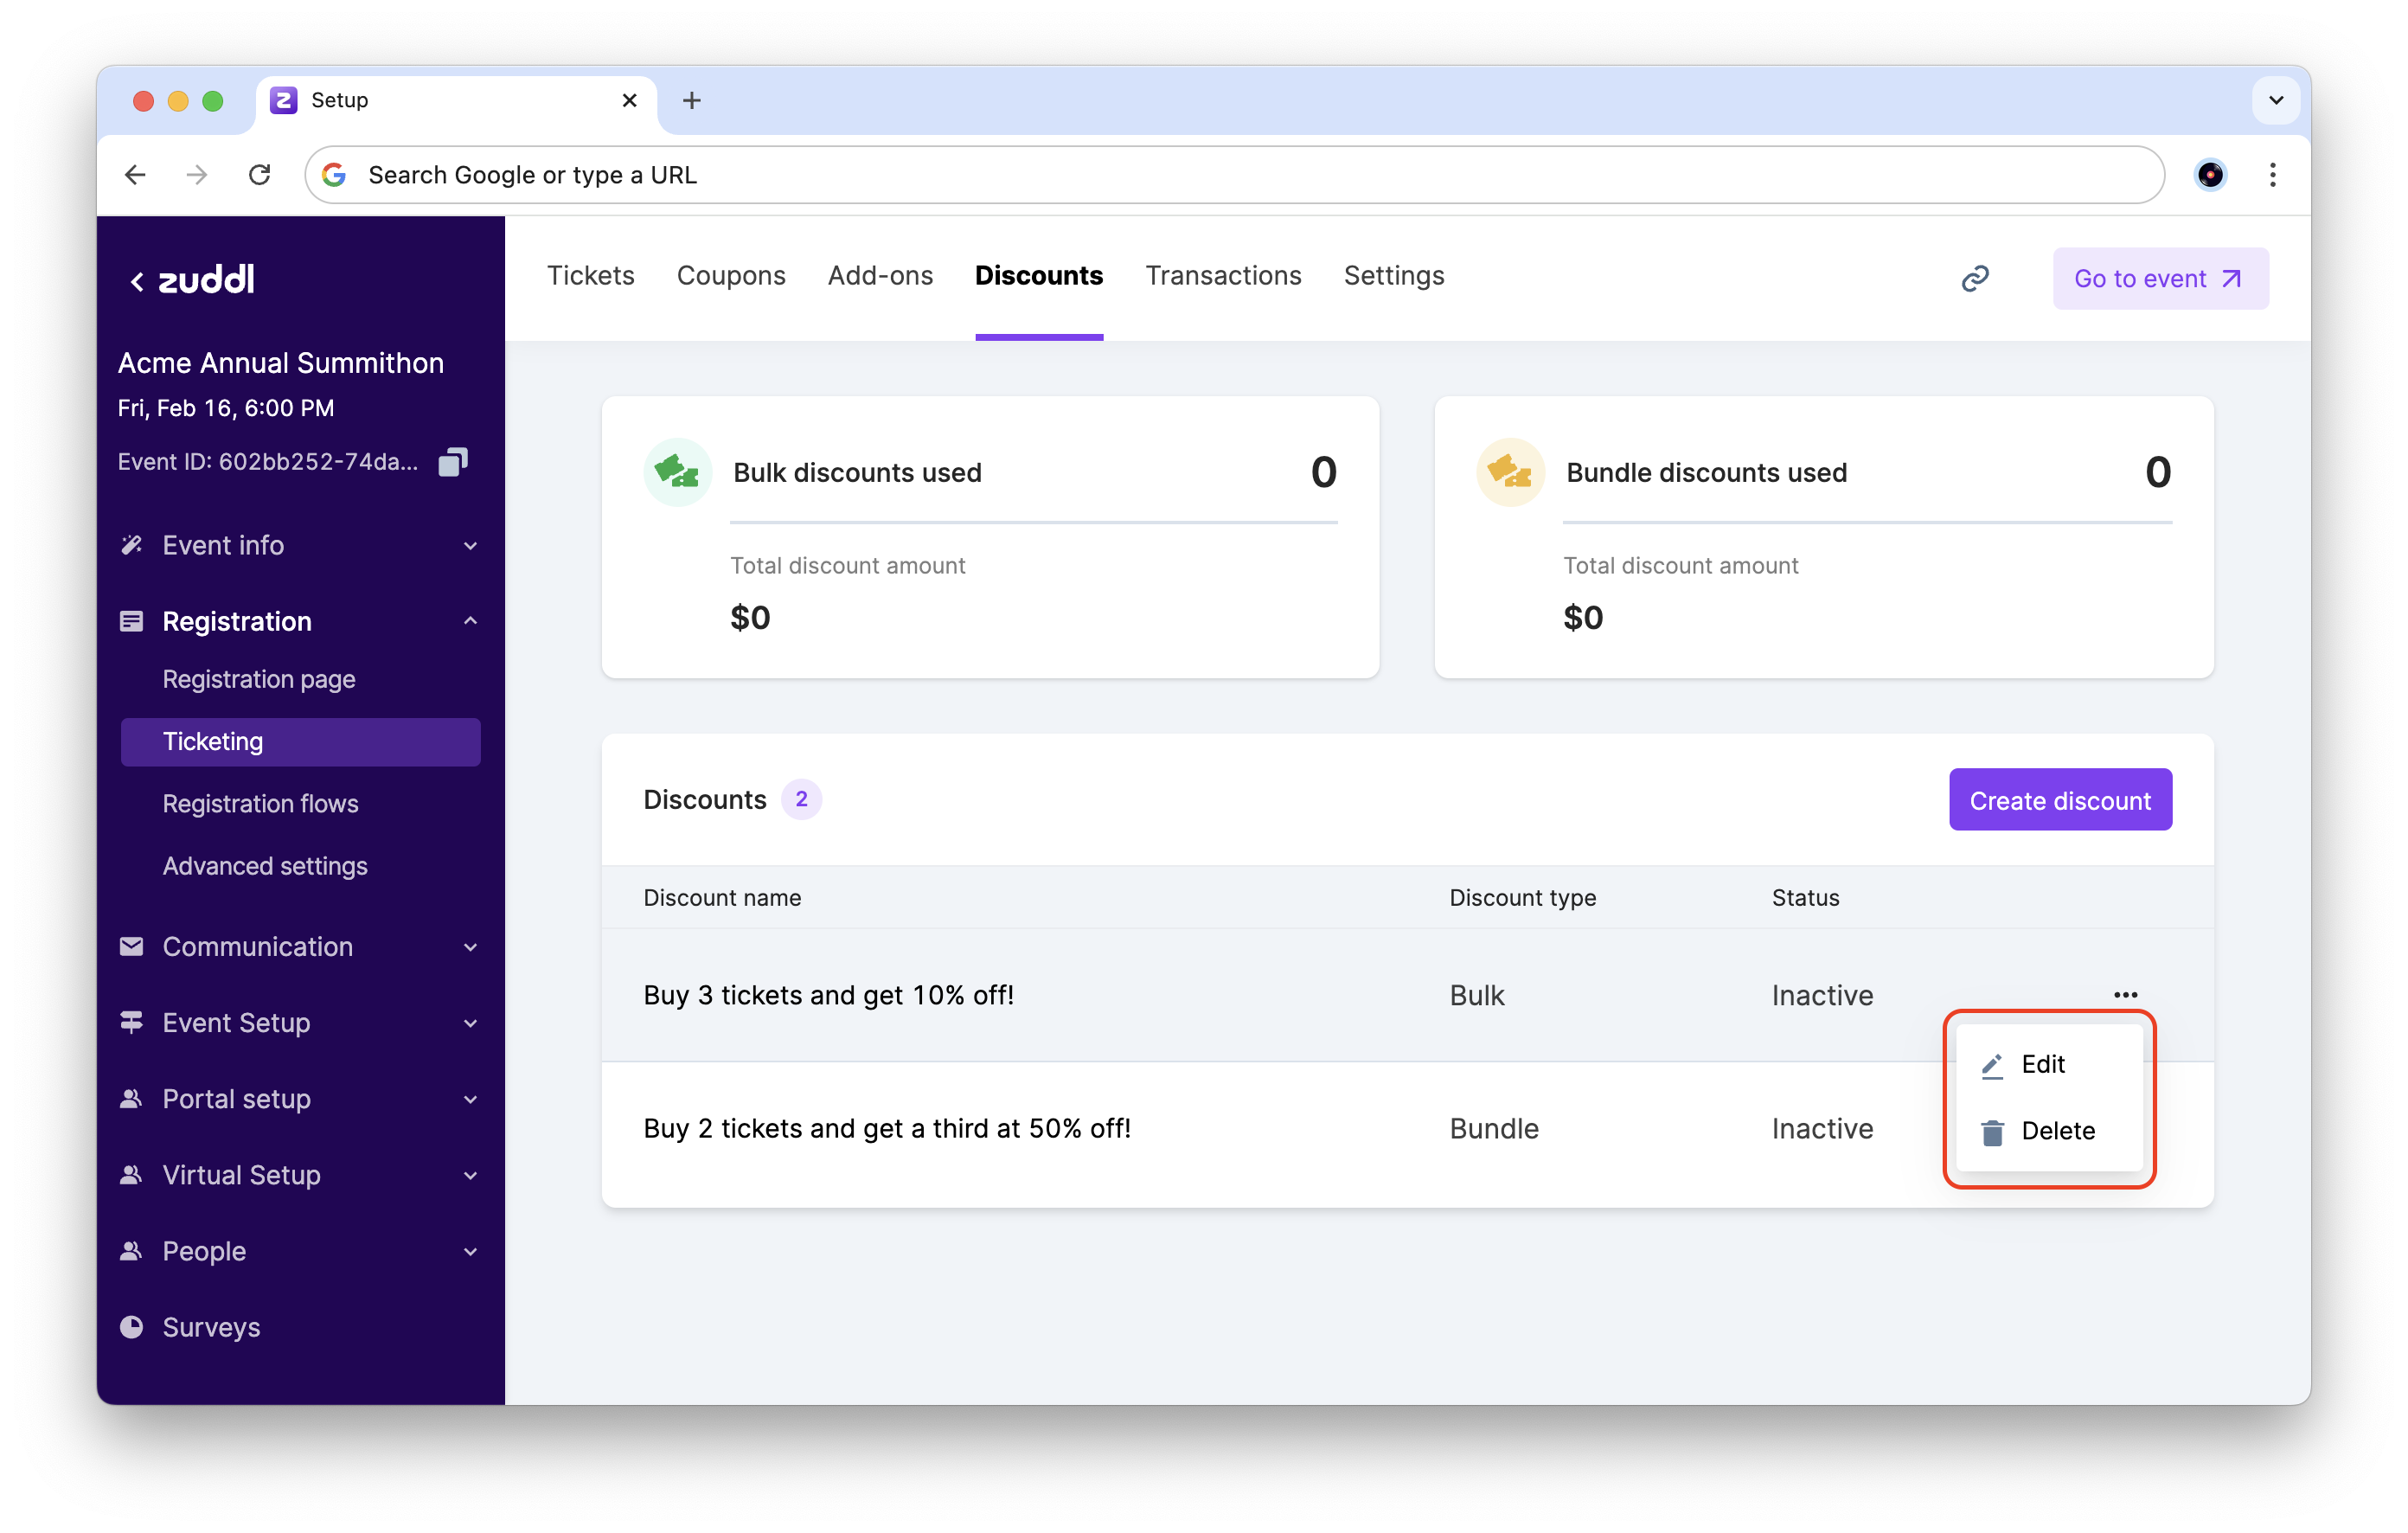
Bundle discounts
Follow these steps to set up bundle discounts for your event:
In the event setup, go to Registration > Ticketing > Discounts. To create a discount for the first time, click Create discount.
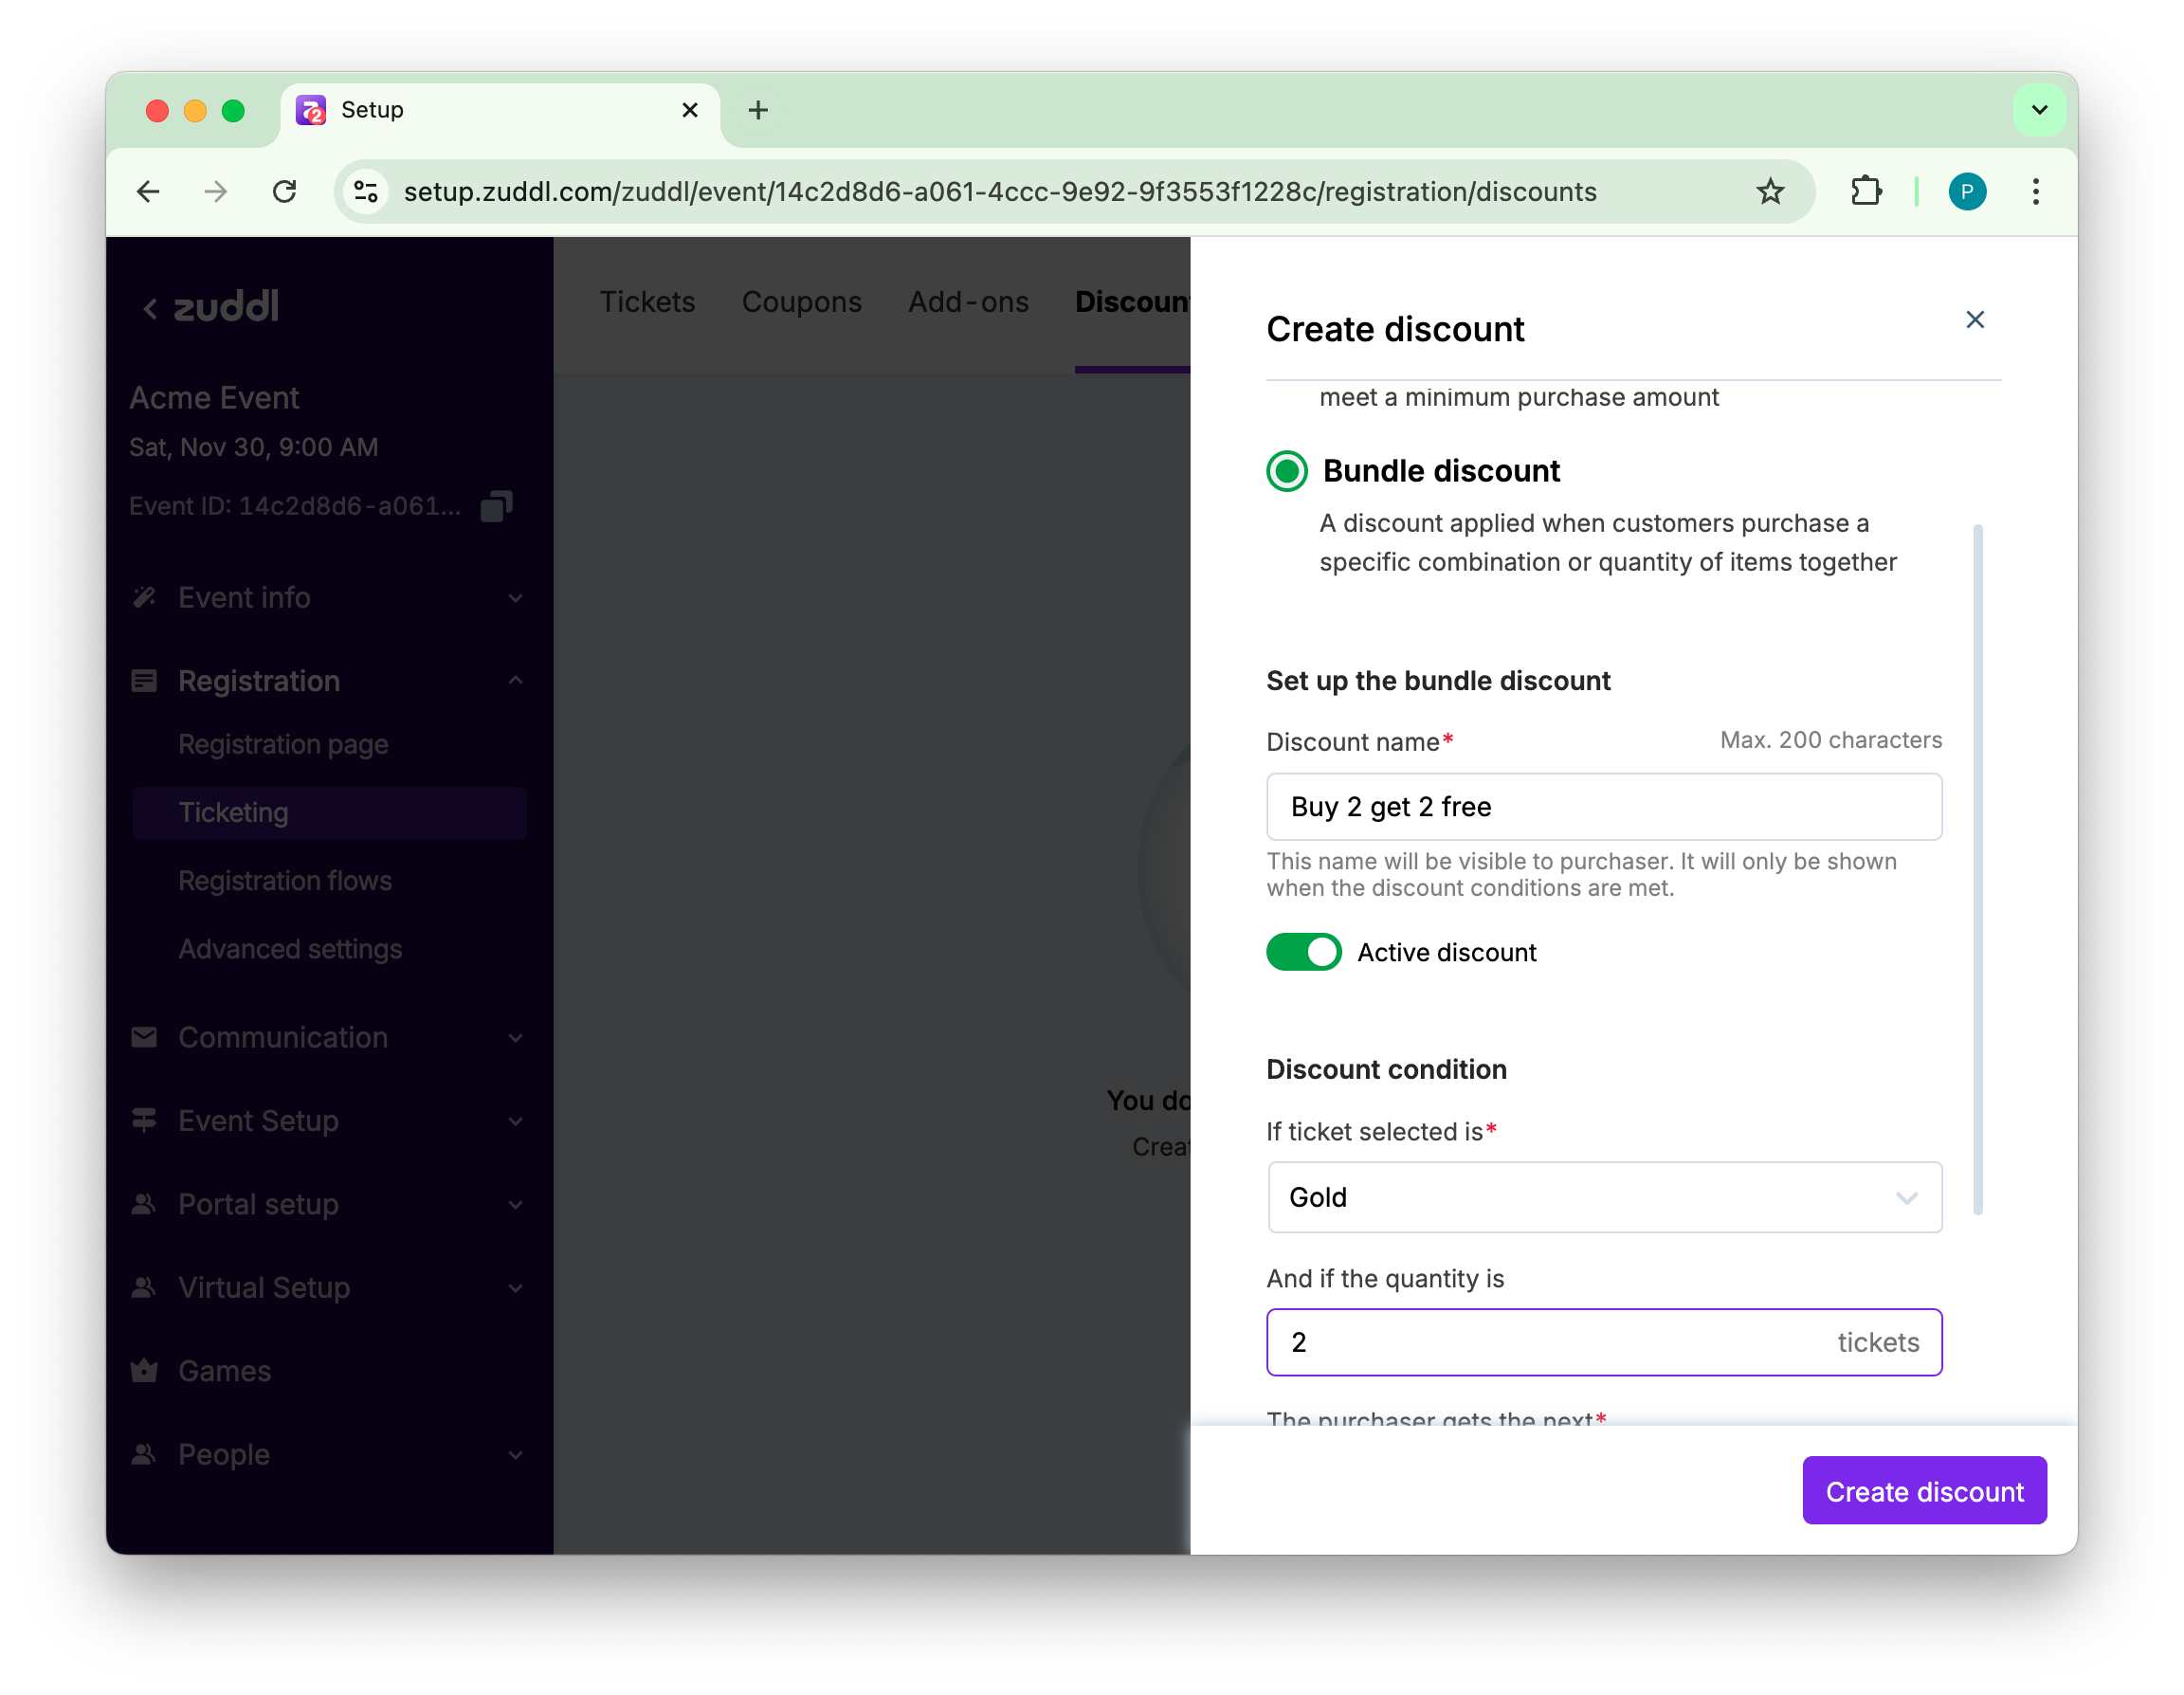
In the sidebar popup, select Bundle Discount.
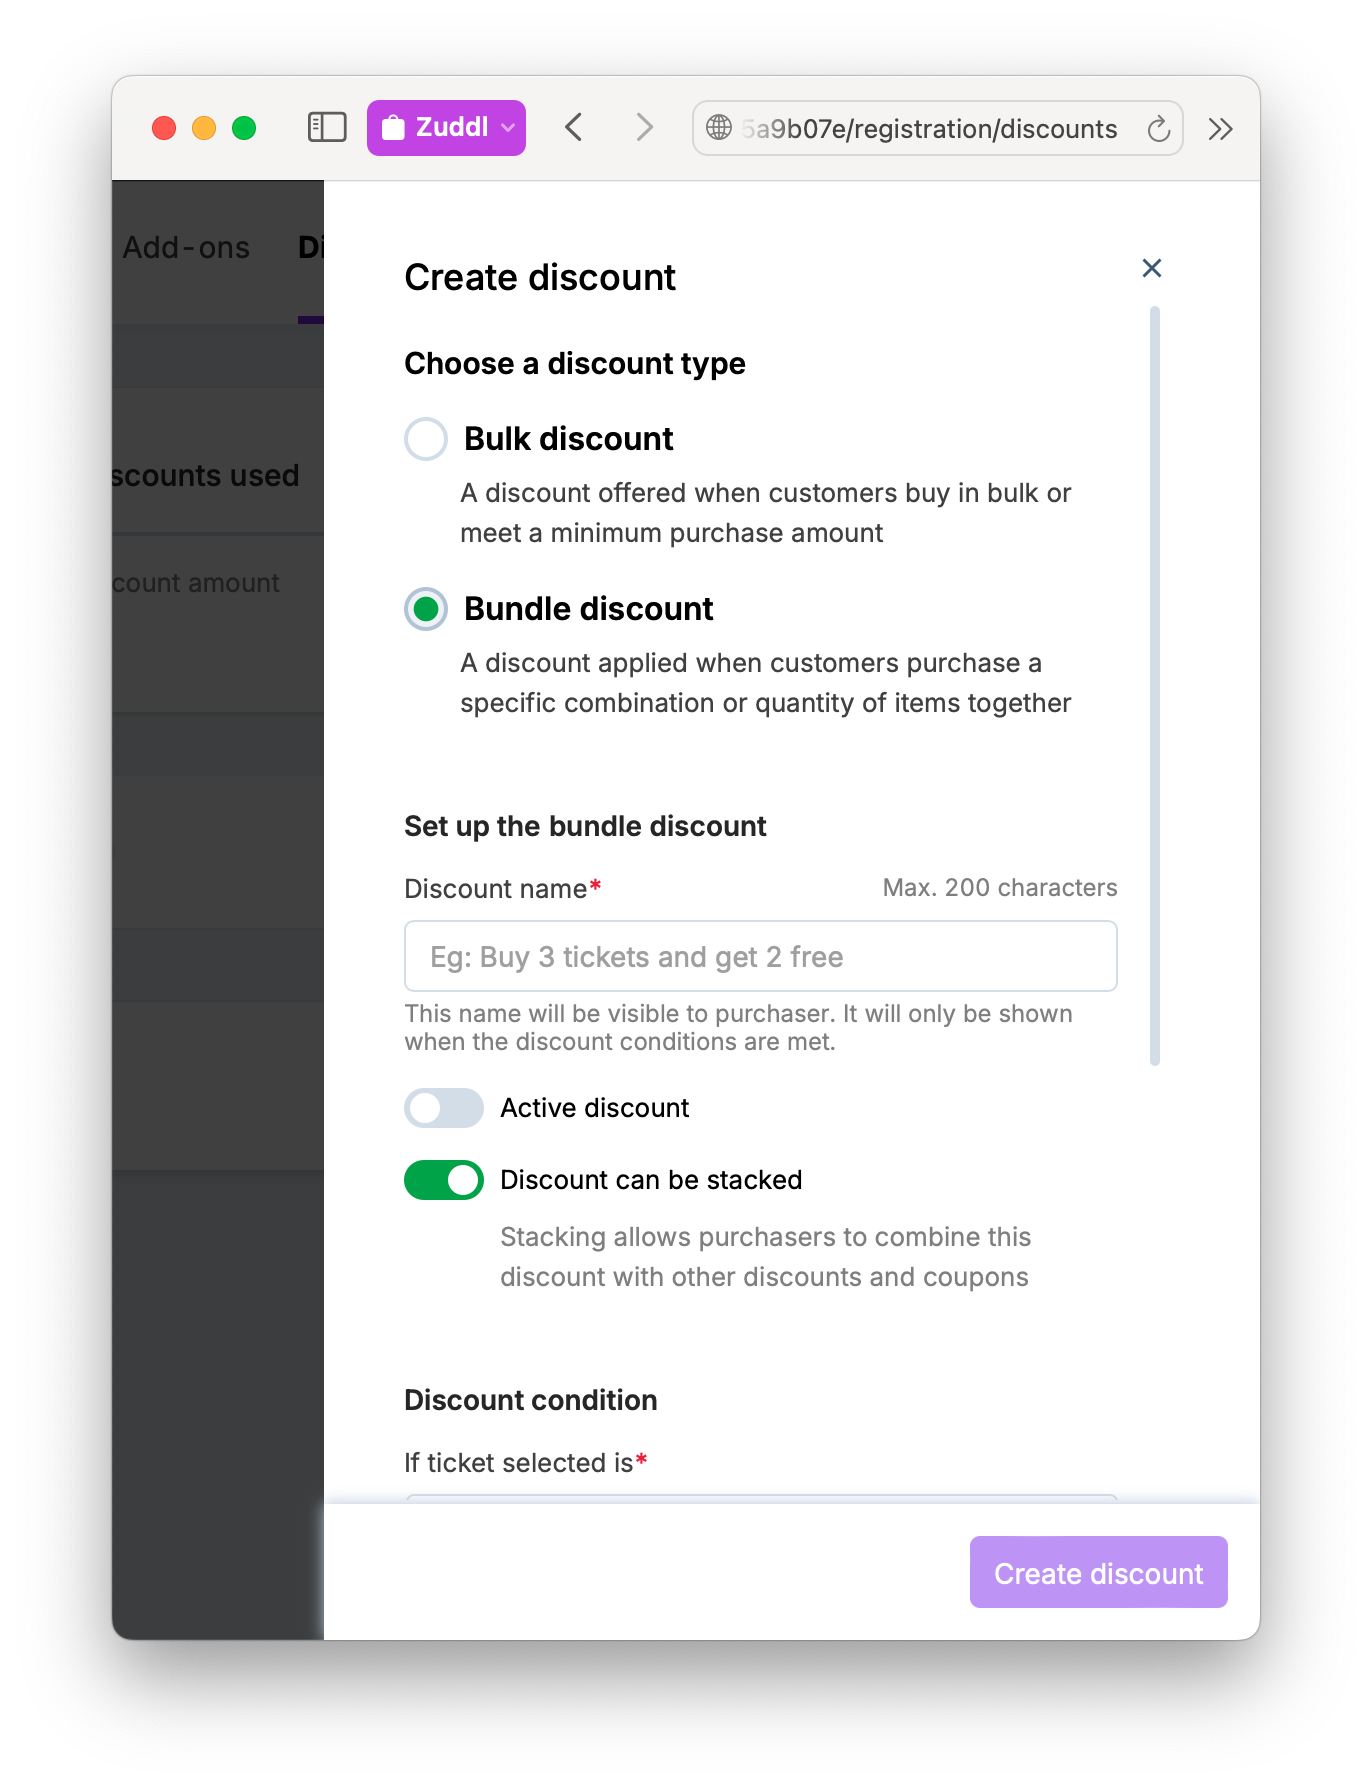
Enter a Discount name (up to 200 characters).
Toggle on Active discount to make this discount usable to purchasers.
Toggle off/on Discount can be stacked option. This option is only available for events with Zuddl native ticketing. The stacking functionality is turned on by default for all events. Reach out to support@zuddl.com to have this enabled for your event. Learn how to use stackable discount.
In Discount condition, you can set up the condition to apply this discount. Under If ticket selected is, choose the tickets to use for this condition. You can choose multiple tickets.
The tickets selected under 'If ticket selected is' field can not be selected for other bundle discount conditions
In the And if the quantity is field, choose the number of tickets that need to be selected for the condition to apply.
In the The purchaser gets the next field, choose the number of tickets to offer in the bundle discount.
In the of field, select the ticket to bundle.
In the at field, choose the discount to apply (Amount or Percentage) and enter the value.
Click Create discount to save these details and create a new bundle discount.
The discount is now listed in the Discounts tab. You can click the more options button to either Edit or Delete a created discount.
If the discount condition is satisfied, the discount is applied to everything in the cart.
If multiple discount conditions are satisfied, all of them are applied and coupons can be applied over this.
The discount that was created first gets applied first.
You can only create one bundle discount per ticket type.
Attendee-side flow
The table below shows the stages of ticket selection along with the discount behaviour.
1. Until the required number of tickets are added by the attendee as per the bulk/bundle discount conditions, The available discounts are shown in the Discount section on the right as shown below 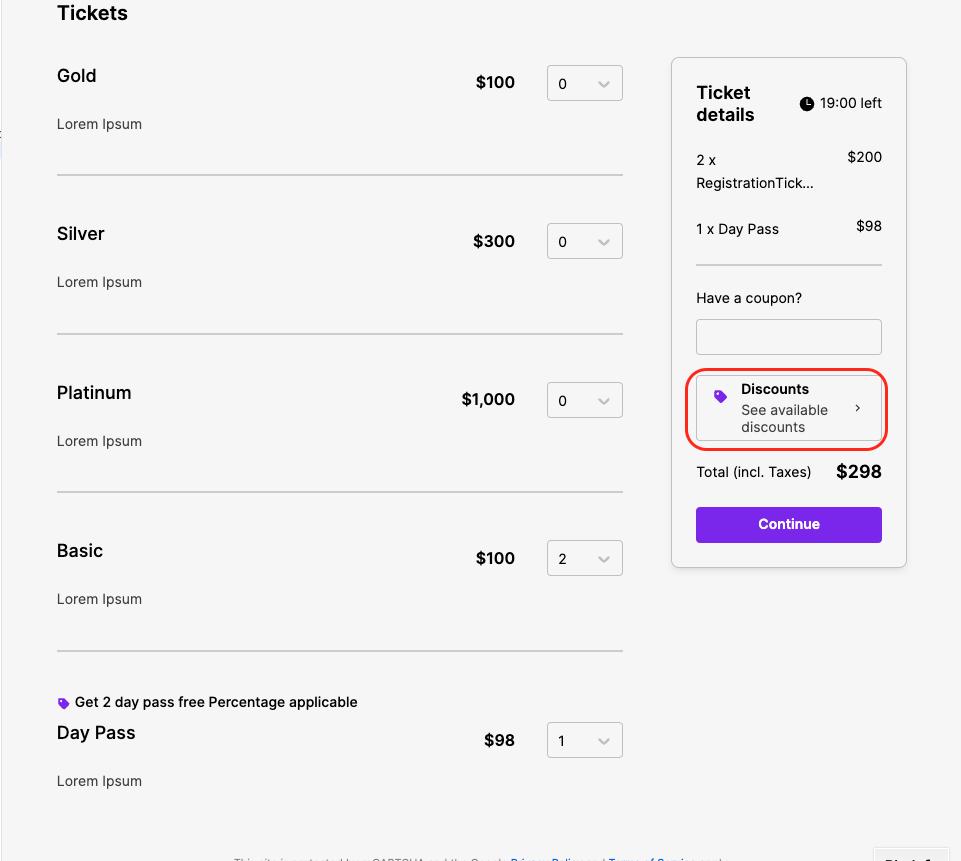 | |
2. On the attendee-side, when a bundle discount is applicable for a ticket type, a label appears on the ticket type that says '#discount name applicable' 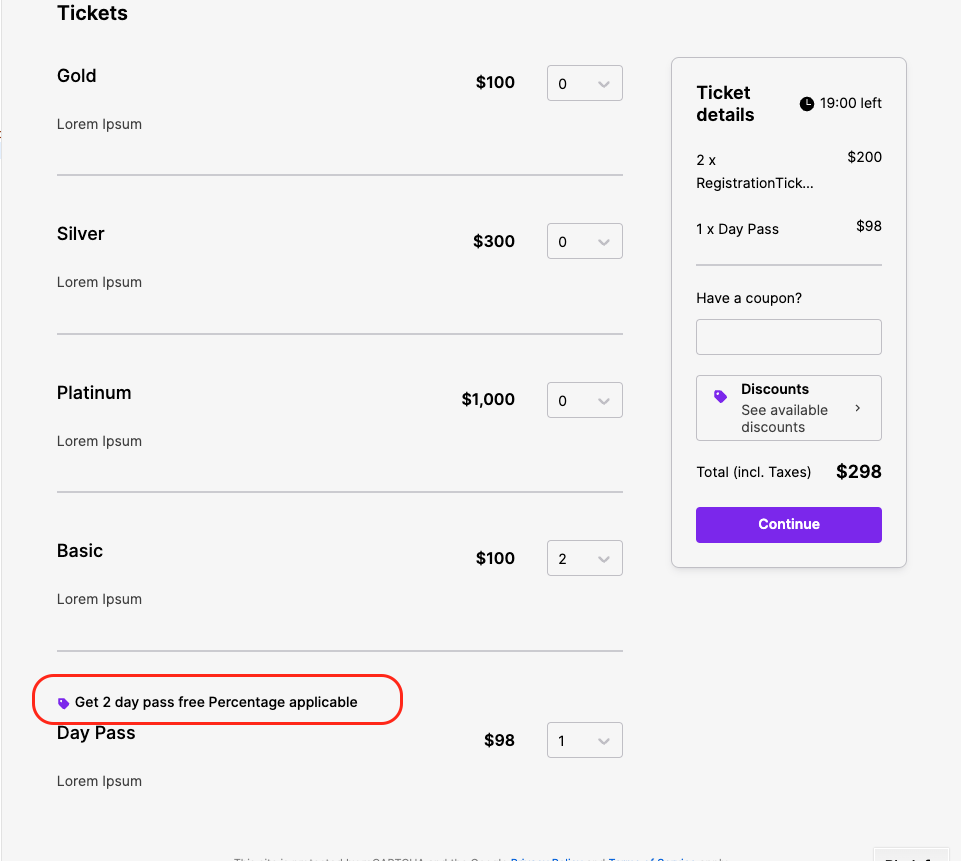 | 3. When the attendee hovers on the label, the condition statement is shown in a tooltip  |
4. When the number of tickets as required by the condition is satisfied, the label says '#discount name applied!' 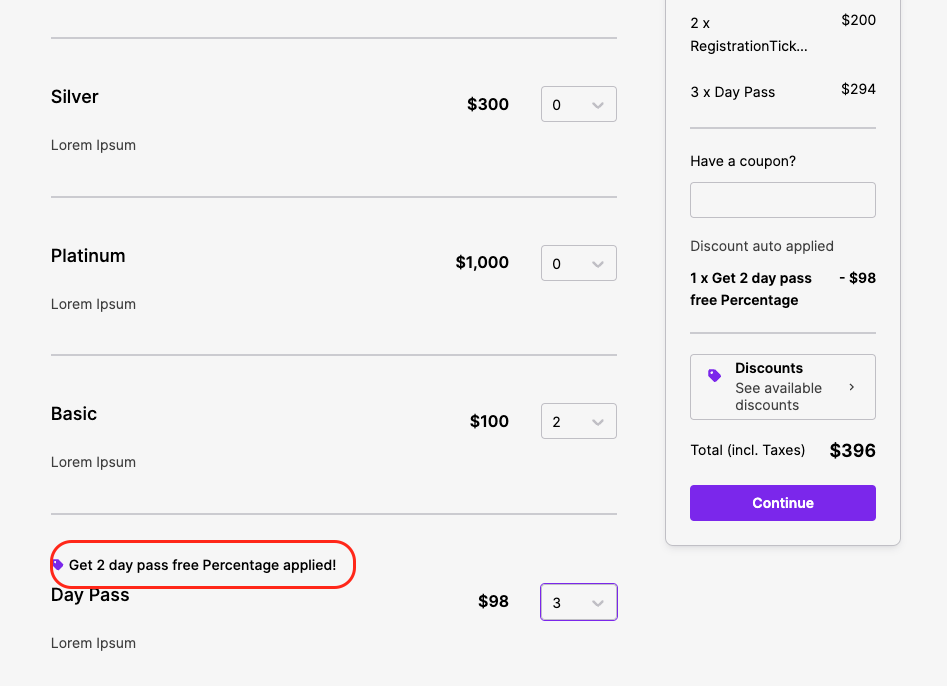 |
Removing multiple tickets
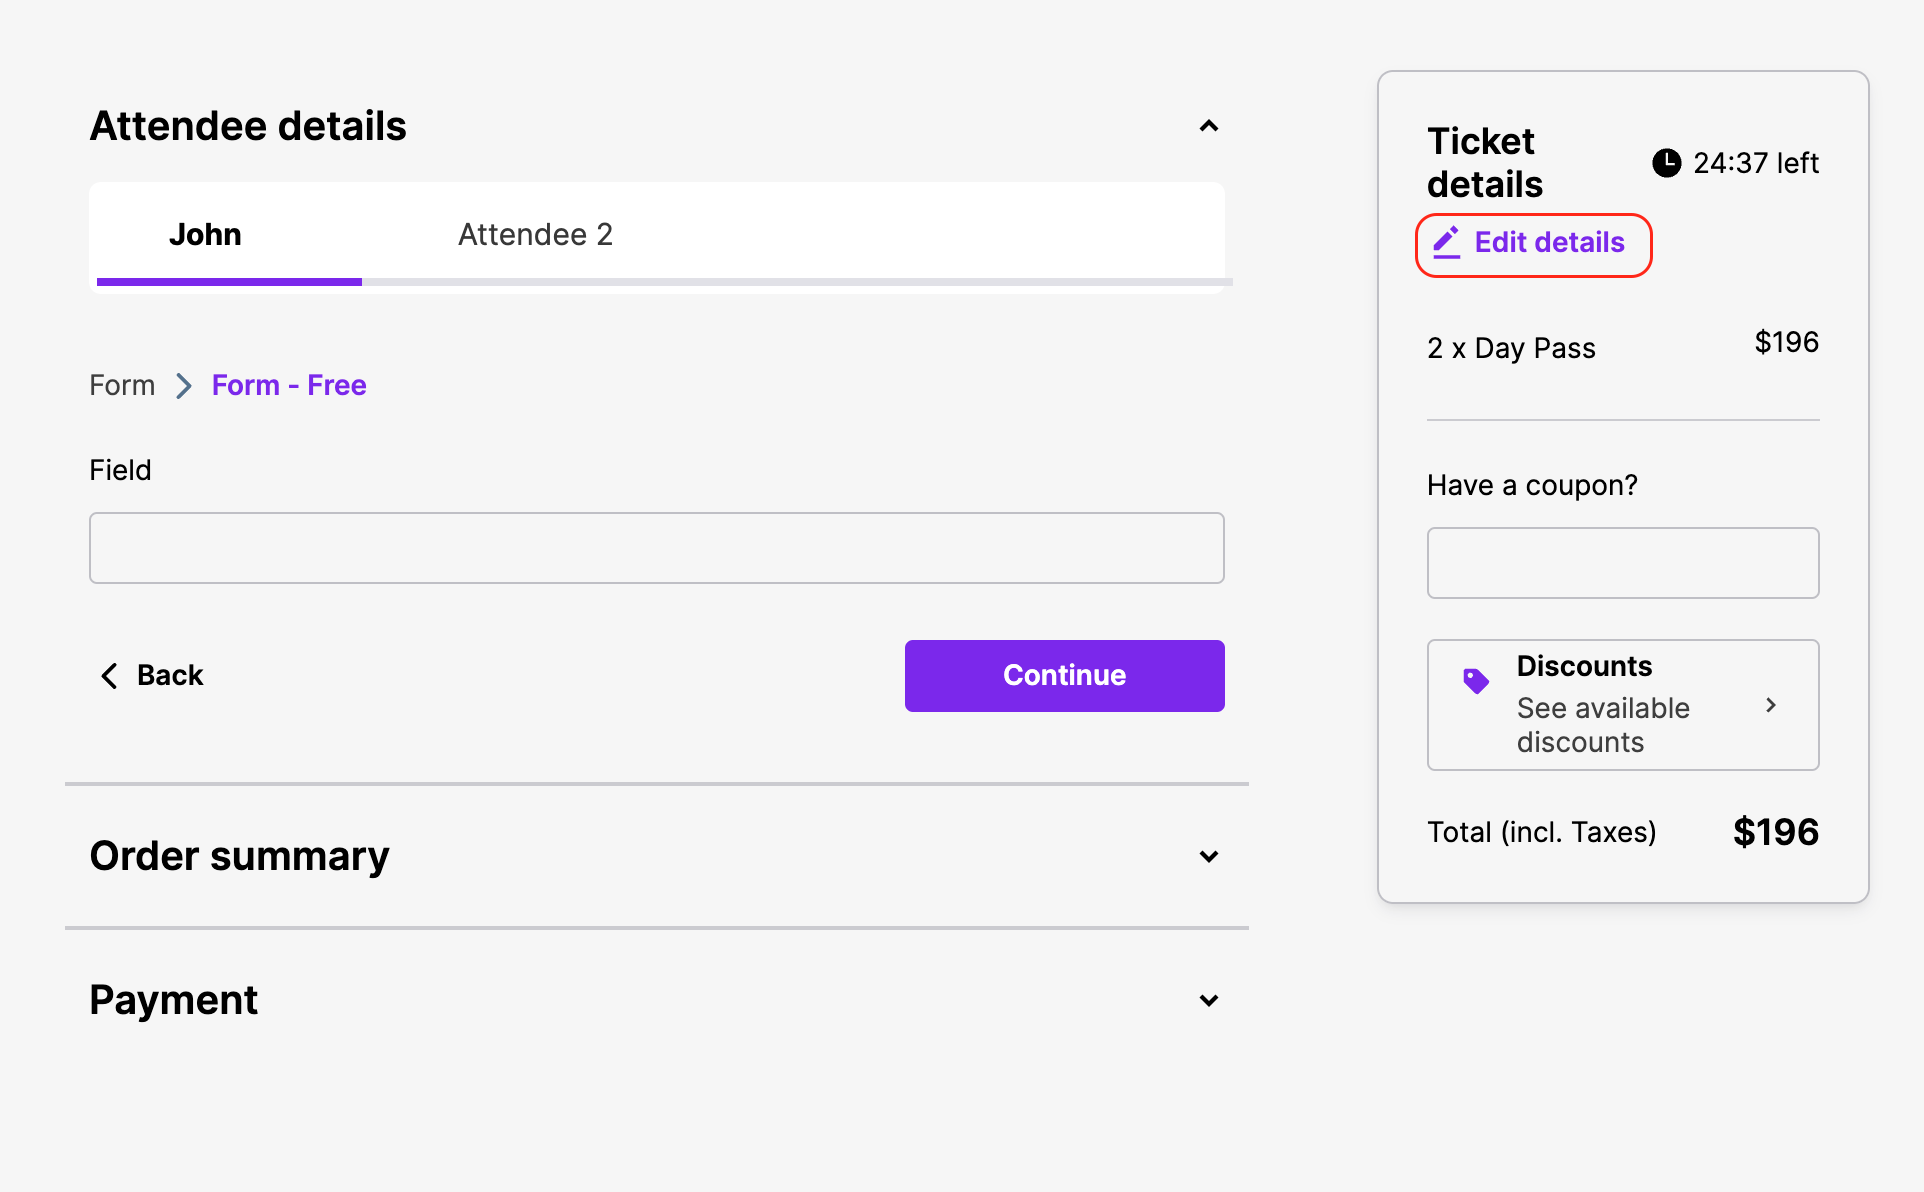
Reducing the number of tickets using the Edit details button will remove attendees starting from the last added attendee.
Multiple bundle discounts
The discount is determined by the order in which you create bundle discounts. For example, consider these bundle discounts created in the following order:
- Bundle 1: Buy 2x Gold -> Get 2 Silver Free
- Bundle 2: Buy 2x Silver --> Get 2 Silver Free
In user’s cart: 2 gold and 3 silver. Let’s consider that the discounts are stackable
Case 1: if bundle 1 was created first, then only bundle no. 1 will be applied i.e 2 silver tickets will be free and 1 paid. Now since only 1 silver remains (uncounted by bundle 1), so the bundle 2 is not eligible.
Case 2: if bundle 2 was created first, then both the bundles are eligible. So first, the bundle 2 will be applied i.e. two silver paid and the third selected silver ticket will be free (bundle 2).
Additional two free silver tickets will also be added as free because of two gold tickets the user selected (bundle 1)
If discounts are non stackable, the maximum discount gets applied.