Approvals Smart Table
Last updated: September 29, 2026
What This Does
An Approvals Smart Table lets you share your event's registration requests with people outside your Zuddl account so they can help you review and decide on them. Instead of forwarding lists back and forth, a reviewer sees every pending, approved, and rejected registration in one place and can move each person to the right status. You decide which rows and columns each person sees and what they are allowed to change.
See also : Smart Tables
How Smart Tables work: A Smart Table is a shareable filtered view built on top of a main data source such as nominations, approvals or registrations. The data lives in the main list, not in the view, so any change made in a Smart Table flows back to the master and shows up in every view that includes that row.
What an Approvals table shows
An Approvals Smart Table is built on your event's pending, approved, and rejected registrations. It comes with a default set of columns:
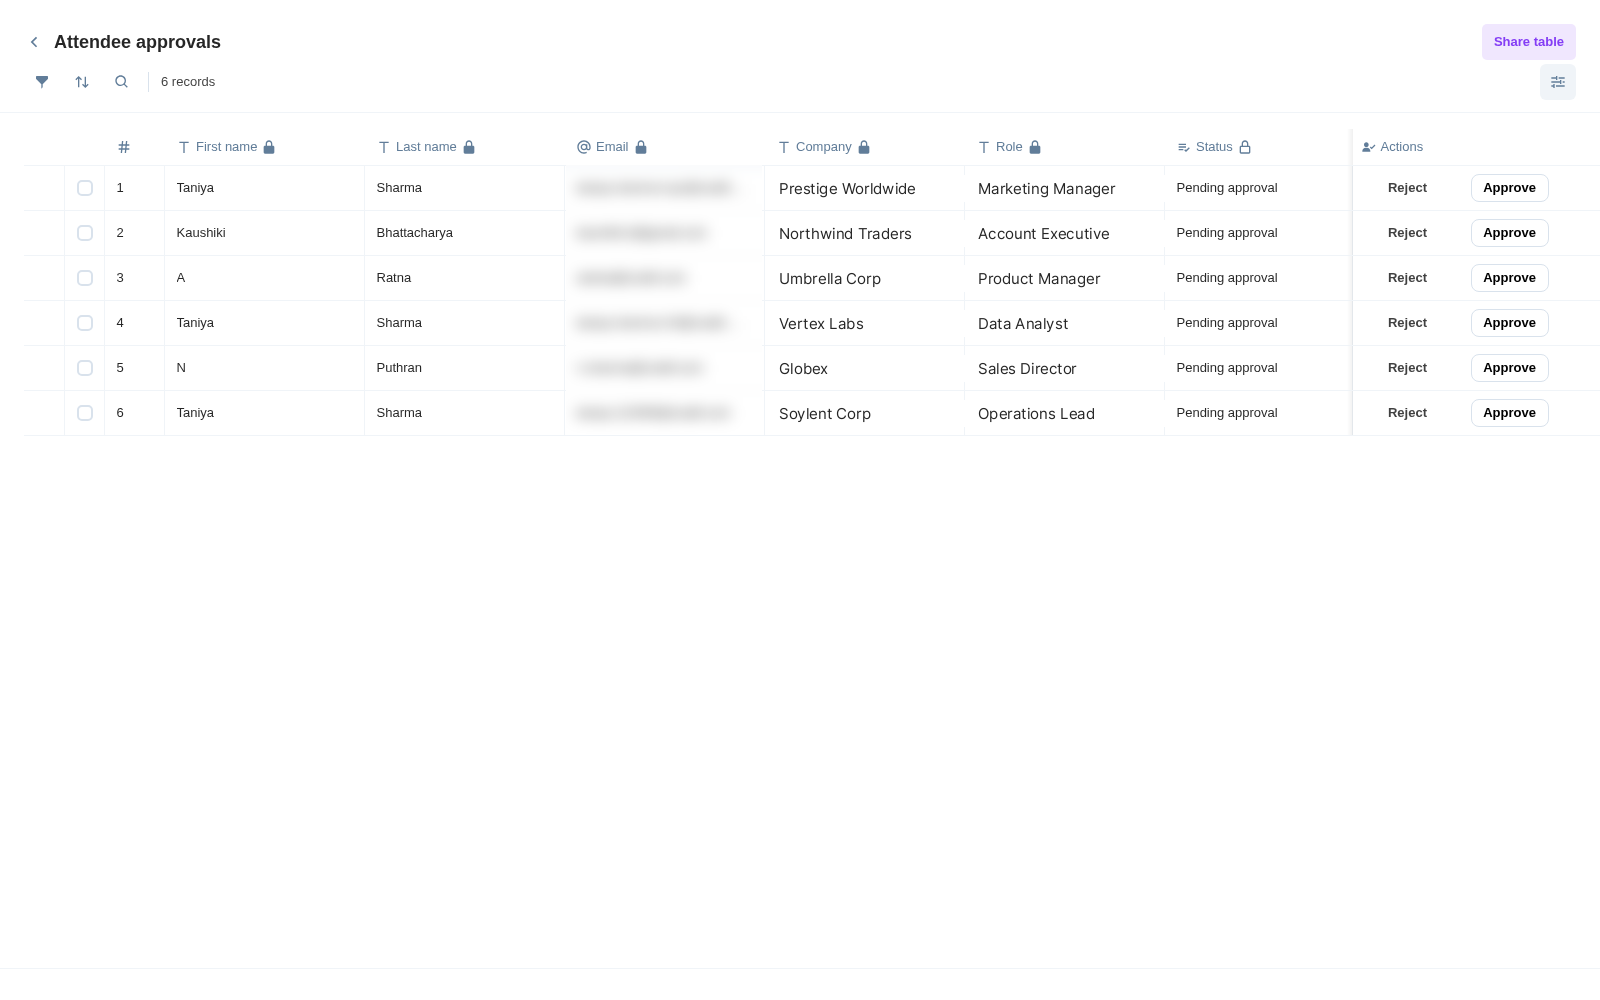
First name, Last name, and Email — shown locked (read-only) so external guests can identify a person but cannot edit their details.
Status
Approved By
You can add more columns to the view from your own fields and control their visibility and edit permissions, exactly as you would on any Smart Table.
Note: You cannot add new rows to an Approvals table — the rows come from your actual registration requests. Adding rows is only available on Nominations tables.
Steps
You can create a Smart Table from two places:
Open the Smart Tables section in the left navigation sidebar and select [+ Create Smart Table]; or open the Approvals tab and select [Create Smart Table] in the top bar.
Choose Approvals as the table type, set a name for the table (up to 80 characters), and select Proceed.
Use the Manage Columns option to control what the view exposes. For each column, set its Visibility (whether the column shows in this view — hiding a column does not remove its data) and its Permission (whether collaborators can edit the column — only fields you create yourself can be set to editable). The name and email columns stay locked.
Make sure the Status and Actions columns are visible so reviewers can approve or reject requests. Setting up custom statuses is covered in its own article.
Open the Share panel, enter external guest' email addresses, and assign each person a role (Editor or Contributor).
(Optional) Turn on the Allow collaborators to export CSV toggle in the Share panel if you want collaborators to be able to export the rows in their view.
What Happens Next
Collaborators log in with their email and a one-time passcode and only see the rows and columns you configured.
They receive a 6-digit code. The resend timer is 60 seconds, and the account locks for 30 minutes after 5 failed attempts.
One login gives an external guest access to every table shared with that email for your org.
Approval/Rejections are dependent on multiple factors such as - tickets being sold out, event capacity, configured emails. Please ensure these settings are setup correctly.
Your configured email workflow gets triggered post an approval/rejection, once you approve/reject a request, the email slated to go out at that action gets fired.
Sharing and roles
There are two collaborator roles. Both can work through the rows shared with them and change a row's status from the dropdown, but only an Editor can approve or reject requests. Neither role can change the structure of a table — only you, the organizer, can change columns, locks, and filters.
Action | Editor | Contributor |
|---|---|---|
View the columns shared with them | Yes | Yes |
Edit unlocked cells | Yes | Yes |
Change statuses | Yes | Yes |
Approve or reject requests | Yes | No |
Export CSV (if enabled) | Yes | Yes |
Add new rows | No | No |
Change the table's columns, locks, or filters | No | No |
Notes
The name and email columns are always locked on an Approvals table so reviewers can identify a person without changing their registration details.
Rows come from your real registration requests — you cannot add rows to an Approvals table. To build a list you add people to yourself, use a Nominations table.
CSV export is off by default. Turn it on with the Allow collaborators to export CSV toggle in the Share panel.
Related articles
Need help with Approvals Smart Tables? Reach out to your Zuddl contact or our support team.